Google have released their own style guide for HTML and CSS code.
It will be interesting to see how much of it they apply in future changes to Blogger templates
But for Bloggers who do a lot of modifications to their own template, there might be some useful tips. I especially like the one about putting CSS rules into alphabetical order for maintainability.
Doing this would mean adding CSS rules manually rather than than through Design > Customize > Advanced > Add CSS
And it will be harder to do a code-compare to see the difference between our customized template and the current standard-issue ones. But storing like-named rules together appeals to me more than just tagging new ones on the end.
Showing posts with label CSS. Show all posts
Showing posts with label CSS. Show all posts
Google's guide to HTML and CSS styles
/
Thursday, May 3, 2012 /
Posted in
CSS,
from Blogger-HAT Lite,
HTML,
Quick-tips,
Template editing

Designing blogs for mobile devices - liquid design and image-width-maximisation
/
Tuesday, May 1, 2012 /
Posted in
CSS,
Design,
from Blogger-HAT Lite,
Quick-tips
Today I read a very interesting article from the Webmaster Central blog about the challenges of designing websites for mobile devices, and a concept called liquid design.
For bloggers who have enabled a mobile template for their blog, the overall site design is handled by Blogger: you can add gadgets to your mobile template easily enough, and if they're in the sidebard then Blogger decides where to show them instead.
But the design inside posts is our own responsibility. I've been pondering this for one of my blogs that definitiely needs a mobile-template view, but which has a number of side-by-side images.
I'm not certain yet, sure, but the article's suggestion to add this CSS rule to my template
might just be a very good one for me to apply.
For bloggers who have enabled a mobile template for their blog, the overall site design is handled by Blogger: you can add gadgets to your mobile template easily enough, and if they're in the sidebard then Blogger decides where to show them instead.
But the design inside posts is our own responsibility. I've been pondering this for one of my blogs that definitiely needs a mobile-template view, but which has a number of side-by-side images.
I'm not certain yet, sure, but the article's suggestion to add this CSS rule to my template
img {
max-width: 100%;
}
might just be a very good one for me to apply.
Customizable styles in Google Docs
/
Wednesday, February 8, 2012 /
Posted in
CSS,
from Blogger-HAT Lite,
Google Docs,
Quick-tips,
stylesheets,
Word
Google Docs now have Customizable styles in documents.
This is a feature that MS Word has had for a long time, which makes a huge productivity difference to anyone who is writing long documents.
Basically, instead of formattting each sub-heading individually (eg making it bold, 12 pt and underlined), you just say once what the rules for that "heading2" is (eg bold, 12 pt and underlined), and then apply "heading2" to any text that you want to look like this. The time-saving comes when make a change. For example, when you realise that underlining is for typewriters, instead of having to change each sub-heading individually, you just change heading2 to be (say) bold and 14 point - and all the same change is made to every place where you've used "heading2".
I don't know the the addition of Styles to Docs means they will be added to Blogger's Post-editor anytime soon. But it may affect loading Word documents to Blogger via Google Docs. I haven't tested yet, so don't know if Word's styles will be kept when the document is converted - but I'd hope that they would, given that it's a very mature feature in Word.
The interesting part will come when you either copy-and-paste or publish from Docs to Blogger: is the formatting itself transferred over, or just the style name?
My guess, without testing, is that for copy-and-paste, it might just be the style name. If that's right, then to make the Word-to-Docs-to-Blogger conversion work, you will need to add CSS rules to your blog, using the same style names used in Docs.
And if you have a lot of email subscribers, remember mind that the messages they receive do not have your blog's stylesheet applied to them. (I experimented with various header style options in BloggerHAT, but eventually gave us and followed the example of other big-time bloggers and applied the formatting manually, for just this reason: no matter what I tried, my email-subscription messages looked bad,)
(BTW: If you know a way to apply a stylesheet to emails sent by Feedburner, or even by Blogger, then I'd love to hear about it.)
This is a feature that MS Word has had for a long time, which makes a huge productivity difference to anyone who is writing long documents.
Basically, instead of formattting each sub-heading individually (eg making it bold, 12 pt and underlined), you just say once what the rules for that "heading2" is (eg bold, 12 pt and underlined), and then apply "heading2" to any text that you want to look like this. The time-saving comes when make a change. For example, when you realise that underlining is for typewriters, instead of having to change each sub-heading individually, you just change heading2 to be (say) bold and 14 point - and all the same change is made to every place where you've used "heading2".
I don't know the the addition of Styles to Docs means they will be added to Blogger's Post-editor anytime soon. But it may affect loading Word documents to Blogger via Google Docs. I haven't tested yet, so don't know if Word's styles will be kept when the document is converted - but I'd hope that they would, given that it's a very mature feature in Word.
The interesting part will come when you either copy-and-paste or publish from Docs to Blogger: is the formatting itself transferred over, or just the style name?
My guess, without testing, is that for copy-and-paste, it might just be the style name. If that's right, then to make the Word-to-Docs-to-Blogger conversion work, you will need to add CSS rules to your blog, using the same style names used in Docs.
And if you have a lot of email subscribers, remember mind that the messages they receive do not have your blog's stylesheet applied to them. (I experimented with various header style options in BloggerHAT, but eventually gave us and followed the example of other big-time bloggers and applied the formatting manually, for just this reason: no matter what I tried, my email-subscription messages looked bad,)
(BTW: If you know a way to apply a stylesheet to emails sent by Feedburner, or even by Blogger, then I'd love to hear about it.)
Lining up the first post and the sidebar
/
Monday, August 22, 2011 /
Posted in
Article,
Blog layout,
CSS,
Template editing
In some Blogger templates, there is a big gap between the bottom of the header and the start of the first post, and this means that the posts and the sidebar are not aligned. This article explains how to adjust the gap, and so remove that problem.
Blogger template layouts
 In the templates that Blogger provides, as well as all third-party templates, the amount of space between elements on the screen is not accidental: designers put a lot of effort into working out what spacing will look good, and then finding ways to put CSS code into the template so that the spacing they want is shown in any browser software that Blogger supports.
But there are times when you may want to change this spacing, and this is easy to do, provided you are willing to accept the disadvantages of editing your template, and if you can work out exactly which part of the template code to change.
The pre-Header gap
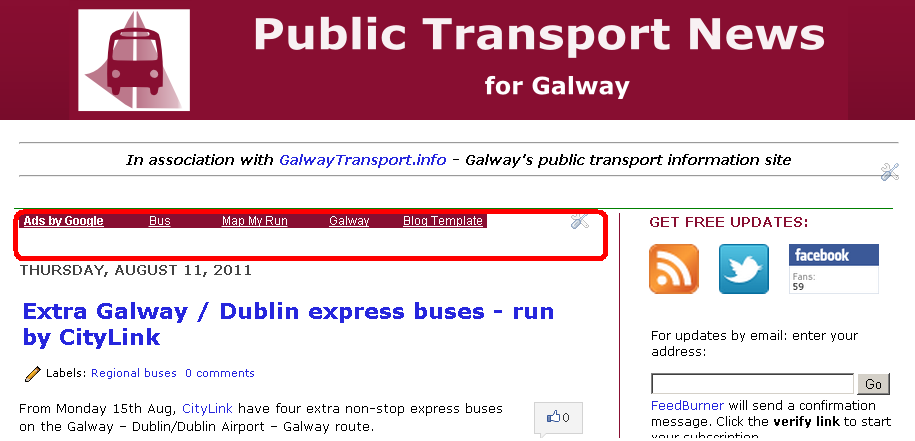
A pet-hate of mine is the blank space above the first post, which looks strange unless you put something else in to the space. In this example, I've got an AdSense link-unit in the area highlighted in red, just to fill in the empty area:
1 Edit your template - don't forget to take a backup.
2 Find this code (use the text-find feature in your browser, eg ctrl/f in Chrome to make finding it easier)
3 Change the first margin value: how much to change it by depends on your template, but in some cases I've used 0 successfully.
In CSS, when a margin statement has three numbers beside it, they refer to the
margins respectively. So if you want to do something else to the post-header, eg indent it, this is the place to make changes
4 Click Preview to see what the blog will look like - keep doing this until you get the right setting.
5 When you are happy with the spacing, click Save Template to apply the changes to your blog. (Or Clear Edits if you cannot get it right and need to stop trying).
Note: If you make a big change to your template like this, it would be a good idea to check out out in at least one version of the other browsers that your readers use - at the moment, this usually means Internet Explorer 8, Firefox and Chrome. But it may depend on your niche - a tool like Google Analytics will give you some statistics about what browsers, and screen sizes, your visitors have.
Also, it is possible to make this change by just installing a new CSS rule for h3.post-title into your blog - because the latest one found is always the one used, and because the template designer's Add CSS function puts the rules you add after the othr rules. I don't recommend it here, though, because working with the original rule makes it easier to see the effect of making changes to any of the values in the area.
Other affected spacing
If you have more than one post per page, then this change will also reduce the amount of space between the bottom of one post and the header of the next one. Depending on your template, you want want to add a little more space into the margin statement in the bottom of the post-footer, eg
If you display comments in your blog, you also need to check the impact on comments, because the original command applied to h4 items in comments as well.
If you are making a lot of changes, you may want to make a test blog, and plan your changes in private before applying them to your main blog.
Related Articles:
Setting up Google Analytics to get statistics about for your visitors
Adding a new CSS rule to your blog's template
Advantanges and disadvantages of editing your template.
How to edit your blogger template
Who did your blogger template come from - the quick way of finding out
Making a test-blog for template changes
Planning changes to your blog in private
Blogger template layouts
 In the templates that Blogger provides, as well as all third-party templates, the amount of space between elements on the screen is not accidental: designers put a lot of effort into working out what spacing will look good, and then finding ways to put CSS code into the template so that the spacing they want is shown in any browser software that Blogger supports.
 But there are times when you may want to change this spacing, and this is easy to do, provided you are willing to accept the disadvantages of editing your template, and if you can work out exactly which part of the template code to change.
The pre-Header gap
A pet-hate of mine is the blank space above the first post, which looks strange unless you put something else in to the space. In this example, I've got an AdSense link-unit in the area highlighted in red, just to fill in the empty area:
How to change this
1 Edit your template - don't forget to take a backup.
2 Find this code (use the text-find feature in your browser, eg ctrl/f in Chrome to make finding it easier)
h3.post-title, .comments h4 {The exact numbers used in your template may be different: the key thing is to find the CSS command that is putting a margin above the post header. In the template that I took this example from (Simple), it's the "0.75em" - which puts 75% of the space of a the post-header characters as a blank space above the header.
font: $(post.title.font);
margin: .75em 0 0;
}
3 Change the first margin value: how much to change it by depends on your template, but in some cases I've used 0 successfully.
In CSS, when a margin statement has three numbers beside it, they refer to the
- top,
- left-and-right,
- bottom
margins respectively. So if you want to do something else to the post-header, eg indent it, this is the place to make changes
4 Click Preview to see what the blog will look like - keep doing this until you get the right setting.
5 When you are happy with the spacing, click Save Template to apply the changes to your blog. (Or Clear Edits if you cannot get it right and need to stop trying).
Note: If you make a big change to your template like this, it would be a good idea to check out out in at least one version of the other browsers that your readers use - at the moment, this usually means Internet Explorer 8, Firefox and Chrome. But it may depend on your niche - a tool like Google Analytics will give you some statistics about what browsers, and screen sizes, your visitors have.
Also, it is possible to make this change by just installing a new CSS rule for h3.post-title into your blog - because the latest one found is always the one used, and because the template designer's Add CSS function puts the rules you add after the othr rules. I don't recommend it here, though, because working with the original rule makes it easier to see the effect of making changes to any of the values in the area.
Other affected spacing
If you have more than one post per page, then this change will also reduce the amount of space between the bottom of one post and the header of the next one. Depending on your template, you want want to add a little more space into the margin statement in the bottom of the post-footer, eg
.post-footer {
margin: 20px -2px 20;
padding: 5px 10px;
}
If you display comments in your blog, you also need to check the impact on comments, because the original command applied to h4 items in comments as well.
If you are making a lot of changes, you may want to make a test blog, and plan your changes in private before applying them to your main blog.
Related Articles:
Setting up Google Analytics to get statistics about for your visitors
Adding a new CSS rule to your blog's template
Advantanges and disadvantages of editing your template.
How to edit your blogger template
Who did your blogger template come from - the quick way of finding out
Making a test-blog for template changes
Planning changes to your blog in private
Installing code into your blog
/
Friday, May 6, 2011 /
Posted in
Article,
CSS,
HTML,
Javascript,
Template editing
This article is about how to install code into your blog.
Why you might want to install code:
 There are plenty of websites suggesting to tweak your blog. A few these tell you how to use standard Blogger tools, but many have written code that does something useful that Blogger doesn't currently provide.
Also, there are lots of tutorials about how to do things with HTML, CSS or Javascript - no matter what "development environment" (Blogger, Dreamweaver, etc) you're working in. For example, I recently wanted to put tables with scroll-bars into the posts of one site, and, after a bit of googling found a method that works across all the common browsers. (Well it worked when I tested it first - sadly it wasn't working in Chrome when I finally finished loading the content, but that's another story!).
I'm generally wary about installing things from 3rd parties. But there are times when it's a good thing to do because the benefits for your blog outweigh the risks - for example, I'm happy to install code from AdSense, Amazon Associates, Chitika, PayPal and various other well known brands.
How to install code:
Two previous articles describe how to install 3rd party HTML into your blog, and how to add CSS to your blog.
The only other type of code that you can add is Javascript. To add this:
1 Edit your template, in the usual way.
2 Find the </head> statement
3 Put the code immediately before </head>, using this format:
4 Click the Preview button, to check that the blog loads and looks ok.
5 If it's not ok,choose Clear Edits and try again: check you are putting the code in the right place.
6 Once you're happy, Save the changes.
Related Articles:
Adding HTML into your blog,
Installing extra CSS rules into your blog.
Planning changes to your blog - in private
Showing Presentations in your blog
Is code from a 3rd party safe to install on my blog? (coming soon)
Why you might want to install code:
There are plenty of websites suggesting to tweak your blog. A few these tell you how to use standard Blogger tools, but many have written code that does something useful that Blogger doesn't currently provide.Also, there are lots of tutorials about how to do things with HTML, CSS or Javascript - no matter what "development environment" (Blogger, Dreamweaver, etc) you're working in. For example, I recently wanted to put tables with scroll-bars into the posts of one site, and, after a bit of googling found a method that works across all the common browsers. (Well it worked when I tested it first - sadly it wasn't working in Chrome when I finally finished loading the content, but that's another story!).
I'm generally wary about installing things from 3rd parties. But there are times when it's a good thing to do because the benefits for your blog outweigh the risks - for example, I'm happy to install code from AdSense, Amazon Associates, Chitika, PayPal and various other well known brands.
How to install code:
Two previous articles describe how to install 3rd party HTML into your blog, and how to add CSS to your blog.
The only other type of code that you can add is Javascript. To add this:
1 Edit your template, in the usual way.
2 Find the </head> statement
3 Put the code immediately before </head>, using this format:
<script type='text/javascript'>//<![CDATA[THE CODE GOES HERE
//]]></script>
4 Click the Preview button, to check that the blog loads and looks ok.
5 If it's not ok,choose Clear Edits and try again: check you are putting the code in the right place.
6 Once you're happy, Save the changes.
Related Articles:
Adding HTML into your blog,
Installing extra CSS rules into your blog.
Planning changes to your blog - in private
Showing Presentations in your blog
Is code from a 3rd party safe to install on my blog? (coming soon)
Centering gadgets on your blog
/
Tuesday, April 26, 2011 /
Posted in
Article,
Blog layout,
CSS,
Gadgets,
HTML
This article is about centering gadgets from 3rd parties that you install onto your blog.
 Previously, I've described how to put HTML code from a 3rd party into your blog.
When code like this is put into a gadget, one common question is "how do I center it?"
There are (at least) three options for doing this.
This will centre the contents and title of every gadget on your blog.
This will centre-align the contents (not title) of the specific gadget that you add.
Note the American spelling of the word "center" - and don't forget to put the closing </div> statement at the end.
There may be some gadgets where it would be possible to add the centring statement to the gadget code itself, rather than putting it outside. I don't recommend this (unless you're so comfortable with HTML and CSS that you don't need to be reading this article), because it introduces a risk that you will interfere with some other aspect, or that you will lose the centering if you ever need to refresh the code.
This approach will only centre the gadget contents - not any header that you give to it.
There are lots of options that you could put into the new style rule, but at a minimum it needs to have
Also, it's best not to use a number as the style-name (eg "2nd-gadgetStyle"), because this doesn't work with some browsers.
Putting HTML code from a 3rd party into your blog
Adding a new CSS style into your template
Centering the header in your blog
Putting a gadget above your blog's header
Removing the attribution gadget from Designer-template blogs

When code like this is put into a gadget, one common question is "how do I center it?"
There are (at least) three options for doing this.
Option 1: Centre all the gadgets in your blog
To do this, add a CSS rule to your blog. The rule to add is:.widget {
text-align: center;
}
This will centre the contents and title of every gadget on your blog.
Option 2: Only center-align the specific gadget
Put the code from the 3rd party (eg PayPal, Amazon, etc) inside a centering statement, like this:<div style="text-align: center;">Install the code into your blog the way you would usually install this 3rd party code.
PUT THE CODE FROM THE 3RD PARTY HERE
</div>
This will centre-align the contents (not title) of the specific gadget that you add.
Note the American spelling of the word "center" - and don't forget to put the closing </div> statement at the end.
There may be some gadgets where it would be possible to add the centring statement to the gadget code itself, rather than putting it outside. I don't recommend this (unless you're so comfortable with HTML and CSS that you don't need to be reading this article), because it introduces a risk that you will interfere with some other aspect, or that you will lose the centering if you ever need to refresh the code.
Option 3 - Make a new style rule just for the gadget
Define a new style that is to be used on specific gadgets: put this new style into your template, and then apply it to the gadget like this.<div class="YourNewSytle">PUT THE CODE FROM THE 3RD PARTY HERE</div>
This approach will only centre the gadget contents - not any header that you give to it.
There are lots of options that you could put into the new style rule, but at a minimum it needs to have
.YourNewStyleNotice that there is a "." (ie a full-stop) before the name of your new style.
{
text-align: center;
}
Also, it's best not to use a number as the style-name (eg "2nd-gadgetStyle"), because this doesn't work with some browsers.
Related Articles:
Putting HTML code from a 3rd party into your blog
Adding a new CSS style into your template
Centering the header in your blog
Putting a gadget above your blog's header
Removing the attribution gadget from Designer-template blogs
Adding a new CSS (formatting) rule to your blog's template
/
Monday, April 25, 2011 /
Posted in
Article,
CSS,
Template editing
This article is about how to add a new Cascading Style Sheet (CSS) rule to your blog's template.
(It assumes that you know the CSS command for the rule you want to add: check a CSS reference guide if you need help to write the command - I've found Sitepoint's HTML Utopia: Designing Without Tables Using CSS very useful.)
 CSS rules are a way to apply standard formatting to HTML: you say what formatting rules are in the rule definition, and then just use the rule name everywhere else in the blog that you want to apply that particular format.
It's useful because it lets you change the formatting throughout your blog by making a change in only one place (the rule).
If your blog has a Designer or Dynamic template, then adding a CSS rule is very easy. (Ref: "What type of Blogger template do I have?")
If you're using a Layout or Custom template it's a little more complicated - and you should make sure you're aware of the disadvantages of changing your blog's template.
1 Log in to Blogger, and go to the Dashboard.
2 For the blog that you want to add the rule to:
In pre-Sept-2011 Blogger (ie the old interface) choose Design > Template Designer > Advanced.
In pre-Sept-2011 Blogger (ie the old interface) choose Design > Customize > Advanced
3 Scroll to the bottom of the list of options, where there is an item for Add CSS. Clicking this opens a panel on the right hand side of the screen.
4 Enter the new rule underneath any other rules that are already listed in the panel. (Unless, of course, you want to change one of the rules that was entered before.
5 Click Apply to Blog (top right corner of the screen),

NB The Add CSS window now shows you any rules that have been added to the template via the window previously.
1 Log in to Blogger, and go to the Dashboard.
2 Edit your template in the usual way.
3 Insert the new rule immediately before this text:
Note: it's likely that there will be other rules already before the quoted text. Make sure that you don't interrupt them, ie that your new rule is placed after the close-bracket } for the rule that's there already, and before the first ]
1 Log in to Blogger, and go to the Dashboard.
2 Edit your template in the usual way.
3 Insert the new rule immediately before this text:
Note: it's likely that there will be other rules already before the quoted text. Make sure that you don't interrupt them, ie that your new rule is placed after the close-bracket } for the rule that's there already, and before the </head> statement.
Advantages and disadvantages of changing your blog's template
What type of Blogger template do I have?
(It assumes that you know the CSS command for the rule you want to add: check a CSS reference guide if you need help to write the command - I've found Sitepoint's HTML Utopia: Designing Without Tables Using CSS very useful.)
What are CSS rules

It's useful because it lets you change the formatting throughout your blog by making a change in only one place (the rule).
If your blog has a Designer or Dynamic template, then adding a CSS rule is very easy. (Ref: "What type of Blogger template do I have?")
If you're using a Layout or Custom template it's a little more complicated - and you should make sure you're aware of the disadvantages of changing your blog's template.
Adding a CSS rule to a Designer or Dynamic template
1 Log in to Blogger, and go to the Dashboard.
2 For the blog that you want to add the rule to:
In pre-Sept-2011 Blogger (ie the old interface) choose Design > Template Designer > Advanced.
In pre-Sept-2011 Blogger (ie the old interface) choose Design > Customize > Advanced
3 Scroll to the bottom of the list of options, where there is an item for Add CSS. Clicking this opens a panel on the right hand side of the screen.
4 Enter the new rule underneath any other rules that are already listed in the panel. (Unless, of course, you want to change one of the rules that was entered before.
5 Click Apply to Blog (top right corner of the screen),
NB The Add CSS window now shows you any rules that have been added to the template via the window previously.
Adding a CSS rule to a Layout template
1 Log in to Blogger, and go to the Dashboard.
2 Edit your template in the usual way.
3 Insert the new rule immediately before this text:
]]></b:skin>
</head>
Note: it's likely that there will be other rules already before the quoted text. Make sure that you don't interrupt them, ie that your new rule is placed after the close-bracket } for the rule that's there already, and before the first ]
Adding a CSS rule to a Classic template
1 Log in to Blogger, and go to the Dashboard.
2 Edit your template in the usual way.
3 Insert the new rule immediately before this text:
</head>
Note: it's likely that there will be other rules already before the quoted text. Make sure that you don't interrupt them, ie that your new rule is placed after the close-bracket } for the rule that's there already, and before the </head> statement.
Related Articles
Advantages and disadvantages of changing your blog's template
What type of Blogger template do I have?
Remove underlining from menu-bar and post-title links
/
Wednesday, April 13, 2011 /
Posted in
Article,
Blog formatting,
CSS
If you underline the links on your blog, then the page-links and post-titles are usually underlined too. But you can turn underlining OFF for these items, and adjust the spacing to make them stand out.
 Recently, I made all the links on Blogger-Hints-and-Tisp blue, because "everybody" knows that real hyperlinks are "always" blue.
I also set them to be underlined because ProBlogger underlines his links, and I guess that he's done the research and knows it's a good thing to do.
Also, I'm aware that colour-blind people sometimes find colour-only links difficult to distinguish.
Changing the links was easy: I just added some CSS rules to my template:
The first rule underlines links that the reader hasn't visited yet.
The second does links that they have visited.
And the third says to keep the underlining showing even when someone hovers their mouse over it.
But adding these rules had one ugly side effect: underlinig the links also underlined post-titles, and the things in the menubar. This made the blog look "clunky", so I had to turn underlining off for certain links.
Notice the !important in that statement: roughly speaking, it says that even if a rule elsewhere in the blog says to underline links, this rule is more important than that one and so this rule should be followed.
Looking at the post titles, I realised that they were a bit cramped. So I added a bit of blank space to them by changing one piece of code, from:
This time, instead of just adding a new rule, I made the change in the template myself. To do this, I:
This wasn't quite as easy as adding CSS through the Template Designer > Advanced tool, but it means that the rules will be kept together and so easer to change in future.
This was just a few small change to the margin - but it made a big difference to the "look" of my posts.
Adding a new, or updated, CSS rule to your blog
Centering the post title in your blog
Removing "Powered by Blogger" from Designer-template blogs
Planning changes to your blog - in private
Underlining links
I also set them to be underlined because ProBlogger underlines his links, and I guess that he's done the research and knows it's a good thing to do.
Also, I'm aware that colour-blind people sometimes find colour-only links difficult to distinguish.
Changing the links was easy: I just added some CSS rules to my template:
a:link {
text-decoration:underline;
}
a:visited {
text-decoration:underline;
}
a:hover {
text-decoration:underline;
}
The first rule underlines links that the reader hasn't visited yet.
The second does links that they have visited.
And the third says to keep the underlining showing even when someone hovers their mouse over it.
But adding these rules had one ugly side effect: underlinig the links also underlined post-titles, and the things in the menubar. This made the blog look "clunky", so I had to turn underlining off for certain links.
How to remove underlining from some hyperlinks
Horizontal Tab / Menu bar
To turn off the underlining for the items in the horizontal menu bar (where people usually put a Pages or Labels gadget), add this CSS style:.tabs-inner .widget li a
{
text-decoration: none !important;
}
Notice the !important in that statement: roughly speaking, it says that even if a rule elsewhere in the blog says to underline links, this rule is more important than that one and so this rule should be followed.
Post titles
To turn off the underlining for the post titles, add this CSS rule:Note that this time I combined the instruction for both visited and un-visited links into the one CSS style rule. I didn't bother adding the !important (eg to make it "text-decoration:none !important);" - but I would have done if I'd found that the blog wasn't displaying correctly.h3.post-title a,
h3.post-title a:visited
{
text-decoration:none;
}
Using spacing to make post title stand out
Looking at the post titles, I realised that they were a bit cramped. So I added a bit of blank space to them by changing one piece of code, from:
h3.post-title{to
font: $(post.title.font);
margin: 0 0 0;
text-align: left;
text-decoration: none;
}
h3.post-title{
font: $(post.title.font);
margin: 0 0 10px 0;
text-align: left;
text-decoration: none;
}
This time, instead of just adding a new rule, I made the change in the template myself. To do this, I:
- Went to Template > Edit HTML > Proceed
- Downloaded a backup copy of the template,
- Used the search-tool in my browser to find the code I wanted to change.
This wasn't quite as easy as adding CSS through the Template Designer > Advanced tool, but it means that the rules will be kept together and so easer to change in future.
This was just a few small change to the margin - but it made a big difference to the "look" of my posts.
Related Articles
Adding a new, or updated, CSS rule to your blog
Centering the post title in your blog
Removing "Powered by Blogger" from Designer-template blogs
Planning changes to your blog - in private
Centering the Post title (or Page title) in your Blog
/
Friday, September 17, 2010 /
Posted in
Article,
Blog layout,
CSS,
Titles,
YY - needs Sept11 review
This article is about how to centre-align the title that is shown for all Posts and Pages in blogs made with Blogger.
Center/Centre alignment:
 Blogger's template designer lets you choose the colour and font-size of the Post title. This is true even for most Layout templates (ref: What type of template does my blog have?) though some don't have an option to edit the post-header.
However it doesn't, yet, have an option to change the alignment, ie whether the title is flush with the left or right side, or in the centre.
But this is very easy to do, provided you're willing to accept the disadvantages of editing your blog's layout template.
Simply add this rule to the CSS section of your blog's layout template:
Right alignment?
Making your header right aligned is just as easy: add this rule instead:
Related Articles:
Adding a new formatting rule to your template
What type of template does my blog have?
Advantages and disadvantages of editing your blog's layout template
Changing colors in your blog
Center/Centre alignment:

However it doesn't, yet, have an option to change the alignment, ie whether the title is flush with the left or right side, or in the centre.
But this is very easy to do, provided you're willing to accept the disadvantages of editing your blog's layout template.
Simply add this rule to the CSS section of your blog's layout template:
h3.post-title{See Adding a new formatting rule to your template if you need help with editing your template to add the rule.
text-align: center;
}
Right alignment?
Making your header right aligned is just as easy: add this rule instead:
h3.post-title{
text-align: right;
}
Related Articles:
Adding a new formatting rule to your template
What type of template does my blog have?
Advantages and disadvantages of editing your blog's layout template
Changing colors in your blog
Adding tooltips (hover text) to Blogger posts
/
Thursday, September 16, 2010 /
Posted in
Article,
CSS,
Hover text,
Post Editor,
YY - needs Sept11 review
This article is about putting a "tooltip" (text that is shown when you hover over) into an URL in a Blogger post.
What are tooltips?
 Tooltips are a feature found in many websites and GUI-based tools: when a viewer hovers their mouse over an item, a small piece of text is shown which explains the item.
You can see them in Blogger's Post Editor when you put your mouse over an item in the toolbar.
How to add a tool-tip in Blogger
Open the Post (etc) that you are working on.
1 Create the item that you want the tool-tip to be on (it may be text or a picture).
2 Select the item, and use the Link button on the toolbar to set up a link for it. (Do this even if you don't want it to end up linked to anything - you can remove the link part alter on.)
3 Go into Edit HTML mode (top right side of the editor toolbar), and find the HTML for the item.
Hint: use the find feature in your brower - it may be helpful to temporarily put some marker text, eg XXX, just before and after the item.
The HTML for the item will have this sort of structure:
4 Add title="YOUR HOVER TEXT" to the HTML, so it becomes something like:
5 (optional) If you don't want the item to be linked, remove the
statement, so the HTML becomes similar to:
6 Return to Compose mode (top right of the Post Editor window), so that you aren't faced with HTML the next time you edit a post.
Formatting unlinked text that has tooltips.
If you put hover-text on words that aren't linked to anything, it's good to give them a different format so that readers know to mouse-over them to see the hover-text. For example
To do this:
1 Add this CSS rule to your blog's template (See Adding a new CSS rule to your template if you need help with this):
If you don't like using red dots as the way to highlight text that has hover-text, there are other rules you can add to your template. For example to get a solid underline in the same colour as the text font, use:
Related Articles:
Adding a new CSS rule to your template.
What are tooltips?
You can see them in Blogger's Post Editor when you put your mouse over an item in the toolbar.
But tool-tips can be used on other things too, including pictures and text: put your mouse over This Text to see one.
They can be particularly useful if you want to provide a translation for a few words from another language, or a definition for technical terms, but don't have enough to make a glossary worthwhile.
They can be particularly useful if you want to provide a translation for a few words from another language, or a definition for technical terms, but don't have enough to make a glossary worthwhile.
How to add a tool-tip in Blogger
Open the Post (etc) that you are working on.
1 Create the item that you want the tool-tip to be on (it may be text or a picture).
2 Select the item, and use the Link button on the toolbar to set up a link for it. (Do this even if you don't want it to end up linked to anything - you can remove the link part alter on.)
3 Go into Edit HTML mode (top right side of the editor toolbar), and find the HTML for the item.
Hint: use the find feature in your brower - it may be helpful to temporarily put some marker text, eg XXX, just before and after the item.
The HTML for the item will have this sort of structure:
or it may be like this if your item is a picture:<ahref="Your Link"> Your item text ...</a>
<img border="0" src="URL FOR YOUR PICTURE" style="margin-left: auto; margin-right: auto;" />or even like this if it's a picture that's linked:
<ahref="Your Link"img border="0" src="URL FOR YOUR PICTURE" style="margin-left: auto; margin-right: auto;" </a>
4 Add title="YOUR HOVER TEXT" to the HTML, so it becomes something like:
or, if the item is a picture:<ahref="Your Link" title="YOUR HOVER TEXT"> Your item text ...</a>
<ahref="Your Link"img border="0" src="URL FOR YOUR PICTURE"title="YOUR HOVER TEXT"style="margin-left: auto; margin-right: auto;" </a>
5 (optional) If you don't want the item to be linked, remove the
href="Your Link"statement, so the HTML becomes similar to:
or, if the item is a picture:<atitle="YOUR HOVER TEXT"> Your item text ...</a>
<img border="0" src="URL FOR YOUR PICTURE"title="YOUR HOVER TEXT"style="margin-left: auto; margin-right: auto;" />
6 Return to Compose mode (top right of the Post Editor window), so that you aren't faced with HTML the next time you edit a post.
Formatting unlinked text that has tooltips.
If you put hover-text on words that aren't linked to anything, it's good to give them a different format so that readers know to mouse-over them to see the hover-text. For example
When you visit Ireland, you will undoubtedly experience rain, ceol and great craic.
To do this:
1 Add this CSS rule to your blog's template (See Adding a new CSS rule to your template if you need help with this):
.toolTippedText {2 While editing your Post (etc) to add the hover-text, also add this class statement
border-bottom: 1px dotted red;
}
class="toolTippedText"to every URL which has title="YOUR HOVER TEXT" added to it. So the full statements become
or, if you don't want the text to actually be linked to anything:<ahref="Your Link" title="YOUR HOVER TEXT"class="toolTippedText"> Your item text ...</a>
It probably doesn't make sense to add a font-decoration like this to tool-tipped images - though it can be done in exactly the same way.<atitle="YOUR HOVER TEXT"class="toolTippedText"> Your item text ...</a>
If you don't like using red dots as the way to highlight text that has hover-text, there are other rules you can add to your template. For example to get a solid underline in the same colour as the text font, use:
.toolTippedText {text-decoration:underline;}
Related Articles:
Adding a new CSS rule to your template.

