Showing posts with label RSS. Show all posts

A quick way to keep an eye on what is posted to interesting YouTube channels

/ Saturday, January 12, 2013 /
This quick-tip is about subscribing to a YouTube channel using an RSS feed-reader, like Google Reader


quick-tips logo
Most bloggers know about other blogs and websites in their niche that they want to keep an eye on, to either know what's going on, or as inspiration for their own posts.

Previously I've explained that RSS was invented to make this simpler: you can get a summary of changes on all interesting websites in the one place (called a feed-reader), rather than having to regularly visit each site individually.

Video is increasingly popular: many bloggers are putting videos in their posts or their posts into videos, and some have even abandoned their blogs and are only publishing new content to a YouTube channel.

I've just found that it's very easy to subscribe to a YouTube user or channel in RSS / Google reader, meaning you can see a list of new videos from you reader, without having to go to the channel in YouTube.

Follow these steps:
  • Find the channel or person you want to subscribe to in YouTube
  • Right-click on their name or icon, and copy the URL / web-address / link location (the precise name depends on the browser you are using - you want the place that clicking the link takes you to, not the location of the image-file used to make the link)
  • Go into your feed-reader, and subscribe to that link (in Google Reader, this is done using a red button near top left corner of the screen labelled "subscribe" - just click it, paste in the link and click the Add button).

The link will be something like  
http://www.youtube.com/user/MariahIsTheQueen  or http://www.youtube.com/channel/UCX9_dIohJBxlizx14AozTng
If it has something else after the name (eg   ?feature=watch), then delete that part before you subscribe  you just need a link saying whether it points to a user or channel, and the name of that user channel.


Example of subscribing to a channel about rocket-science in YouTube

Blogger-HAT Lite: quick updates about Blogger and related tools

/ Tuesday, January 24, 2012 /
Introducing Blogger-HAT Lite - quick notes about changes in other products that are important for Blogger users to know about.


Today, I'm officially launching Blogger-HAT-Lite - a new blog where I share quick notes about changes in product other than blogger, which I think Bloggers may be interested in, or definitely need to know about.

All Blogger-hints-and-tips readers are invited to visit the site, subscribe by RSS or subscribe to by email.


More than just buzz ...

Blogger-HAT-Lite is not about repeating brigth-and-breezy announcements from other services.
Instead, it aims to:
  • Filter these, so that only ones with (possible) implications for Blogger users are reported
  • Suggest questions that need to be asked and issues that need research about the effect on Blogger integration
  • Link to information about related topics - especially ones that talk about consequences that the people making the original changes may not have thought about.


... but less than fully-researched articles

I started Blogger-Hints-and-Tips for my own notes about Blogger, especially  problems that I couldn't find the answers to by googling.

It was also a test-bed for tools like Analytics that I wanted to use on my main blog, but needed to try elsewhere first. After installing it, I notice that other people were looking for the same answers - and when they googled, my notes were what they found.

I quickly found that the most interesting topics were about making Blogger "play nicely" with other products, rather than Blogger itself.  At the same time, I aimed to spend 15 minutes/day answering questions in the Blogger Help Forum - to say thanks for all the help I received when I was getting started.

Typing the same answers over and over got tedious, and when I found something new later on that would have changed a previous answer, it wasn't feasible to find the earlier answers and update them. So I started writing articles about things that people were asking for help with, so I could just link to the article from the discussion.

So I started researching and writing longer articles with the background, solution and the wider  consequences (what will you see? what do your readers see? what else do you need to think about?).

These articles can become out-dated due to changes the other product, that I might not notice. So I started reading the official announcements about Picasa, AdSense, Analytics, Gmail, Maps, etc - so that I knew what was changing, and could think about the effect on my own blogs, and Blogger-Hints-and-Tips.
Right now, I have 230 potential article topics, and 130-ish articles that need updating for the new Blogger interface - just as the recession has eased and I have a full-time day job. Simple math shows that I'm not going to be able to write articles that meet my research standards, in the time now have. And I keep seeing new things that I'd would love to explore but know I won't get around to.


So Blogger-HAT-LITE is:
  • A home for quick notes about these issues
  • A way to keep track of interesting things I see,and 
  • A place to share interesting-but not-fully-researched updates with my readers.


What's covered:

Blogger users could use hundreds of other products in conjunction with theeir blogs. Any spammer could set up a feed-based site that searches other sites for the word "blogger" and reposts the results.

Instead, I've selected a group of products to monitor: ones that I use and recommend, and which I a know a lot of Blogger-users use. So far the list includes:
Picasa
Youtube
Gmail
AdSense
Analytics
AdWords
Google Custom Search Engines
Feedburner
Google Affiliate Network
Webmaster Tools (Webmaster Central)

And these (currently :-)  non-Google products:
Chitika
LinkedIn
Facebook
Twitter
Amazon Associates

More will be added as I start using more products, or discover announcements-blogs for existing ones (eg Google Maps).

Are there any other tools you would like me to keep an eye on, so I can think about whether changes in them affect Blogger? Leave a comment below ...


Stay up to date:

You can visit the Blogger-HAT-Lite now (don't expect stunning graphics etc - this is a site for news, not design).

Or sign-up to read the Blogger-HAT-Lite RSS feed in a feed-reader , or  get updates email.

The most-recent articles from Blogger-Hat-Lite are in a widget here on Blogger-Hints-and-Tips: it's currently in the sidebar just under the subscription options, but may around as I experiment with things.

For the moment, I'm not going to give it a separate social media presence: I'm planning to share both Blogger-hints-and-top and Blogger-HAT-Lite updates in the existing Facebook or Google+ pages and Twitter account. (This may change if enough people ask for it, though.)

Thanks for reading, I hope you find the new site useful.


Related Articles:


Why RSS is important for you blog

How to share your posts to a Facebook page (and not an individual profile).

Understanding the follow-by-email gadget and Feedburner.

Other products that bloggers use with their blogs

Turning the RSS feed off or on again

/ Friday, December 30, 2011 /
By default, public Blogger sites offer an RSS feed.  But there may be times when you need to turn it off, either for good or temporarily.

RSS and Blogger

Previously I've explained what RSS is and why it's important for bloggers.

But there may be times when you want to turn off your RSS feed, either because you don't want to offer one at all, or because you want to make some posts, or changes to existing posts that are not notified to  your RSS subscribers.

Or you may need to turn it back on again - for example, if you want to use a dynamic template, to offer a subscribe-by-email option, or to enable automatic posting to Google +.


How turn off a blog's RSS feed:

In post-Sept 2011 Blogger (aka the new interface):
  • Go to the Settings > Other tab.
  • Under "Site Feed", use the drop-down to change Allow Blog Feed to "None".  
    (This is the only option that totally turns your feed off:  the others, including Custom, leave some aspects of the feed on.)


In pre-Sept 2011 Blogger (aka the old interface):
  • Go to the Settings > Site Feed tab.
  • Beside Allow Blog Feeds, use the drop-down to change the value to "None". 
    (This is the only option that totally turns your feed off:  the others, including Custom, leave some aspects of the feed on.)


How turn on your RSS feed:

This is just the same as turning the feed off (see above), except that your need to choose one of these options instead:

  • Full - the whole post is shown in your feed
  • Until Jump Break  - only the part of the post before the jump break is sent to your feed
  • Short - only the first 120 (ish) letters, or less if the jump break comes first, are sent to your feed.

Also, the new interface has a Custom option, and the old interface has an Advanced Mode.   If you use these , you can individually set the value for post feed, comments feed (all comments), and comments-feed-per-post.


Private blogs 
Blogs that are not public do not offer RSS feeds, because they cannot be secured.   So if your blog is private, then it does not matter what setting you choose, your blog will not offer an RSS feed.


Related Articles:


Understanding RSS - why it's imporant for bloggers who want to grow an audience

What are dynamic templates

Linking your blog and the social networks

Follow-by-email gadget:  an easy way to offer email subscriptions

Private blogs aren't as secure as you might think

Adding an RSS feed icon to your blog, using Feedburner

/ Tuesday, June 14, 2011 /
Feedburner's chicklets are used to add the standard "orange radar" button to your blog.  This lets readers to subscribe the RSS feed of your choice.   The information is targeted to Blogger users, but most of it applies to anyone who uses Feedburner.


What is a Chicklet, and why you need one:


Previously I've explained how to remove the (ugly and confusing) "Subscribe to Posts (atom)" link from your blog, and why RSS / Subscribe to Posts is important to your blog and how to create a Feedburner feed for it.

But an RSS feed is useless unless people subscribe to it.  So as well as making the feed, you also need to put something in your blog that lets your readers sign up for it.

A standard option for this is the orange square with "radar" markings on it, which many people call a "chicklet" (since it lets your viewer - the chicken? - have access to the feed you are providing).


Feedburner also has options for:
  • Using a custom icon from popular web aggregators
    I'm not sure that this is a great idea, because you don't know what feed-reader software your readers actually use, and the whole point of a feed is that you don't dictate how people see your blog.
  • Using an icon that promotes Feedburner.  This cute, but I've never seen anyone use it.

How to add a chicklet to you blog:


Log in to Feedburner, using the Google account that owns the feed.

Click on the name of the feed you want to provide a subscription tool for.

Choose the Publicize tab.

Choose the Chicklet Chooser option, from the left navigation bar.

Choose one of the options shown:  the default one is the standard-size RSS-radar-button.

Scroll to the bottom of the screen and either
  • Choose Blogger from the drop down list beside "use as a widget in", and click Go. 

    This takes you to a Blogger screen where you can choose which blog you want to add the gadget to (if your current login has more than one), and what title to use for it. 

    When this is done, click Add Widget. 

    This takes you to the Design > Page Elements tab, where you can drag-and-drop the widget to wherever you want it.  
    (When I tried it just now, instead of the layout screen I got a "bad request" message.  However pressing Save and then View Blog brought up the blog with the gadget showing, and I was able to go back and edit the layout later on).


What your readers see:


Your readers will see an item, wherever you put it, that looks like this:


or this:

Add to Google Reader or Homepage

or

Subscribe in Bloglines

or something similar, depending on what option you chose from the Chicklet Chooser screen.

When someone clicks on one of these items, they are taken to either a screen where they choose which feed-reader software to add your site to (if you've used the first option), or to the specific feed-reader software.


Customising the widget code:


If you use the generic RSS button, then you may want to customise the widget code slightly:  It looks ugly not to have a space between the picture and the word "Subscribe" - and it's good to have the phrase "RSS" on the screen because that is what feed-reader-savvy people generally search for when they're looking at a site and want to find the subscribe option.  I also prefer if the subscribe action opens in a new tab/window, rather than taking the reader away from my blog.

This is quite easy to do, if you put a few line breaks in so you can see that
  • the code is actually two separate link statements
  • the first one has an image (the orange "radar bars" that it takes from Feedburner)
  • the second is a text link
  • both of them link to the RSS feed address

So it's quite easy to add a couple of extra spaces (shown as   ), change the text as I've done below, and add   target="_blank"   to both of the links
<a href="http://feeds.feedburner.com/Blogger-hints-and-tips" rel="alternate" type="application/rss+xml" target="_blank">
<img src="http://www.feedburner.com/fb/images/pub/feed-icon32x32.png" alt="" style="vertical-align:middle;border:0"/>
</a>

&nbsp; &nbsp; &nbsp;

<a href="http://feeds.feedburner.com/Blogger-hints-and-tips" rel="alternate" type="application/rss+xml" target="_blank">

Subscribe via RSS

</a>

I generally also put the option to subscribe to my blog by email and the Feedburner FeedCount item (which shows the number of subscribers) in the same area, to give people options, and to encourage them to subscribe.


Related Articles:


Using Feedburner to give your blog a Subscribe by Email option

Adding 3rd party HTML to your blog

Why RSS / Subscribe to Posts is important to your blog

How to create a Feedburner feed for your blog

Feedflare lets you add social tools to your RSS feed

/ Thursday, May 26, 2011 /
This article is about using Feedburner's tools for adding interactive features and social networking links to your RSS feed items.


What is FeedFlare useful for?

Many bloggers spend a lot of time making social sharing features available on-screen in their blog - using things like Facebook's share button, follow-me on Twitter, etc.

But all this effort is lost on people who view your blog via an RSS feedreader.  All they see is the content that's sent through your feed:  they don't see any gadgets at all, unless they click-through to look at your blog.

If your feed is being managed with Feedburner, then the FeedFlare tools let you add social networking and interactive links to each post that you send out in your feed.   Unlike your blog, you can't control where they're put or how they look.  But many people believe that having them in a limited form is a lot better than not having them at all.

Currently the tools that can be added using FeedFlare include
  • Email the author
  • Post to Facebook
  • Post to Digg This
  • Save to del.ic.ious
  • Discuss on Newsvine
  • Stumble! it
  • Add to Mixx!
Note that Twitter isn't currently included.


Turning on the FeedFlare for your feed:

Log in to Feedburner, using the Google account that owns the feed


Click on the name of the feed you want to work with.

Choose the Optimize tab

Click on FeedFlare in the left hand navigation bar.

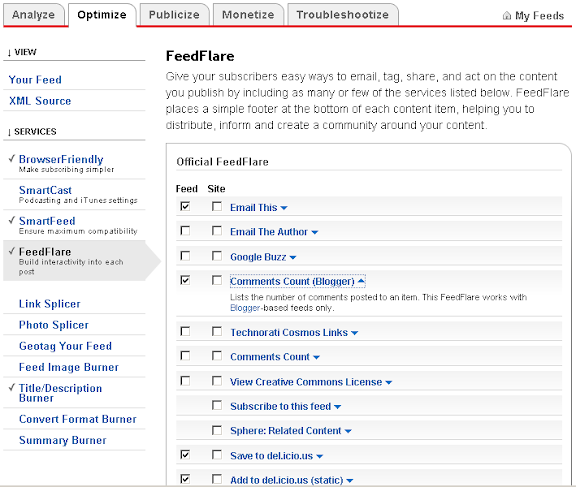
This opens a list of the options that can currently be turned on using the FeedFlare function - as show in the picture below.
Note:  this list has expanded during recent months, it's worth checking back occasionally to see if something you would find useful has been added.


Tick the items that you want to use in the column headed "Feed".   Each thing that you tick will show up at the bottom of each feed item when it's viewed in an RSS reader.
Many (or even all) item-names can be clicked on to show a more detailed explanation of what the item is about.  eg clicking on "Comments Count (Blogger" reveals the explanation "Lists the number of comments posted to an item. This FeedFlare works with Blogger-based feeds only."

The Personal Feed Flare section lets you add more Flare items, either by choosing from Feedburner's catalogue or by building your own using Feedburner's API.
I'm not doing to discuss these options here, except to note that
  • Potentially this tool can be used to add your custom items (eg an eBook that you have written) to your feed, so they're available to subscribers.  (I may devote a future article to this)
  • Many of the items in Feedburner's catalog but not on their main list were developed by 3rd party developers - as with other widgets and templates, I'm very reluctant to recommend using them, because of the lack of assurance that they do exactly - and only - what they claim to.

When you are happy with the options selected, click Activate to start the service - or click Save if you have adjusted the flare options.

You will know that the change has been made because the word Feedflare (in the left navigation bar) has a small tick beside it.   Check for this - it's very easy to miss the Activate button because it's at the bottom of the screen and you have to scroll to get to it.

Job Done!


Note:  There is also a column headed Site.   This lets you generate code to put the items ticked into your website, and t he "on Site" section at the bottom of the screen gives you  the HTML code to put FeedFlare for the ticked items onto your site, and has (slightly out-of-date) instructions for how to install the code into Blogger.    I'm not recommending this, because there are now plenty of articles about how to put better-looking and more functional items into your blog.


What your readers see:

How your reader see posts when they view them with a feed reader depends on their own browser settings (as always), and also on specific the feed reader software they're using (Google Reader, Bloglines, etc).

The picture below shows the bottom of my Blogger-Hints-and-Tips feed, when viewed in Google reader.   The items selected in FeedFlare are shown as bullet-ed items.  Underneath that, Google Reader also has some other links too.


Related Articles: 


Making a Feedburner feed for your blog

Putting a subscribe to me feed option on to your blog

Tools for linking Blogger and the Social Networking sites

Adding a Tweet button to your blog

Linking your blog and the social networks

Putting a badge for a Facebook page into your blog

Why RSS / Subscribe to Posts is important for your blog

/ Monday, May 9, 2011 /
This article explains why an RSS feed is important to bloggers, and some options for making it available.

Overview

Previously, I've described how to hide the Subscribe to Posts (atom) link that appears that the bottom of the screen on all Blogger's standard templates.

This is a sensible thing to do, because the link:
  • is ugly, 
  • is hard to find (except for hardened Blogger users who know what they're looking for), and 
  • uses words ("atom") that don't mean much to many readers, especially ones who don't use Blogger.
But providing an RSS feed for your blog is A Very Good Thing to do, and there are many ways of doing it which don't involve that link.


Why is an RSS feed a good thing?

When websites were invented, people found that it took a lot of time to visit all their favourite sites regularly just to check for any changes.   It was frustrating for sites that don't change often.  It was hard to spot changes in big sites.   And web-site owners realised that some people simply wouldn't remember to check back anyway.

A few approaches were created to solve this problem.  One is RSS ("really simple syndication"), which is based on the idea that
  • Websites are set up so that every time they are updated, they "publish a feed" of what's new, and
  • People who are interested in websites use "feed reader" software to check if the sites they are interested in have new material, and
  • Feed aggregator tools sit in the middle and keep track of what websites have published and what sites individual people are interested in what updates they have read so far.
Blogs that are made with Blogger are really just another type of website, so to work with RSS they needed a way to "publish a feed" of new material when posts are added.

The approach that Google originally used for Blogger involves "Atom" format.  The "Subscribe to Posts (atom)" link that appears on the bottom of most Layout and Designer templates is saying
 "Here's a link for your feed-reader to use, in our Atom format".
This works, but as I've said, it's ugly and not so obvious for non-Blogger-users.  The rules used to publish feeds on the internet have developed over time and different ways of organising the data in "feeds" (eg Atom 2.0, XML) have been adopted.  And website publishers have begun to look for more features in their feeds and in the statistics they get about who reads them.

Blogger also has a a Subscription-links gadget, which has buttons to let users subscribe to either your Posts or your Comments.  Recently I've had difficulty with this gadget:   I can add it, but it doesn't actually show up on my blog.   I've reported this via the Something-is-broken section of Blogger Help Forum, but not found a solution.


Alternatives:

cute picture of an anthropomorphic rabbit
The simplest alternative to the "Subscribe to posts (atom)" link is to make something else on your website that points to the same place as that link, but looks more obvious.
For example, you could use a cute picture of a rabbit, or even some text like "Follow this blog in RSS".

All you need to do is find the RSS feed address for your blog, and link it to this picture or text.

But although this gives your readers access to your feed, it does nothing for you.


A better alternative is to use a tool like Feedburner.


This takes your blog's "raw" feed and delivers it to subscribers in the format your specify - and also offers a number of other features including tools to
and many more.

Other alternatives?

There are other products that can be used to do similar things.

But Feedburner was purchased by Googe in 2007 (according to Wikipedia), so it's now part of the Google family of products.   Until I find some feature that I need but it doesn't have, I'm not likely to explore other tools, simply because it's often easier to use products from the same toolset.  

Your mileage may vary.  But if you're interested click here to find out about getting started with Feedburner.


Related Articles: 


Adding an RSS feed icon to your blog

Giving your blog an email subscription option, using Feedburner

How to hide the Subscribe to Posts (atom) link

Finding the RSS feed address for your blog.

Blocking categories of AdSense ads from your blog

Getting started with Feedburner

/ Thursday, May 5, 2011 /
This article is about how to set up Feedburner to produce a feed from a blog.  It is targetted at Blogger users, but most of the information applies to other types of blogs and webpages too.

Overview


Previously I've explained why an RSS feed is important to bloggers,

Feedburner is one option for addressing the limitations of Blogger's "native" feeds.

And although it's owned by Google now, it was originally a different company so isn't quite the same as good to set up.   


That said, getting started with Feedburner is actually very simple. You just:
  • "burn" (ie create) a feed from your blog (or other website), 
  • put something in your website that lets your visitors choose to subscribe to your feed.

This article is about the first step, creating the feed.


Burning a Feed in Feedburner


Follow these steps:

1  Go to Feedburner:  http://www.feedburner.com/

2  Log in, using the same Google account that owns your blog.

Feedburner doesn't enforce this:  you can burn feeds for websites, blogs etc that you don't own.   But if you are interested in managing the rights of your blog overall, and in particular if you may want to give it to someone else to manage, it's very helpful if the same account owns all the components in your blog.


NOTE:  if you have added the Follow-by-email gadget to your blog, then you will already have created a feedburner "feed" for it.    You can find out if there is one by looking on the screen that's shown when you log in to Feedburner.   If you do have a feed then you may want to continue using it, rather than set up a new one.


3  Enter your blog's URL in the "Burn a feed right this instant" field

4  Press Next

5  Choose a feed source:

Because Blogger's current standard is to provide two feeds for each blog (one in Atom format, one in RSS format), Feedburner will show you a message saying "Feedburner discovered more than one feed at that address", and asking you which one you want to use.


Currently, I don't know any advantages of using either one, so I generally leave it on the default (ie first) option.

6  On the next screen, you can change the suggested values for the the feed's title and part of it's URL.  
  • The title is the name that the feed will be known as in your Feedburner account.
    It's possible to burn more than one feed from the same blog, if you want different features on different feeds.  If you're going to do this, make sure you use names that are meaningful to you.
  • The URL is the one that feed-subscribers need to enter into their feed-reader-software to subscribe to your feed:  this isn't normally seen by human-beings so doesn't need to be meaningful - Feedburner generally makes it a "tiny-URL" style of abbreviation.


7  Feedburner then creates your new feed, and shows you a congratulations message.

This message includes the name of the feed.  Theoretically you could share this with your audience, but I've noticed that sometimes it has extra spaces it in.   It's far better to wait and use the tools from the Publicize tab to share your feed with your viewers.

8  You are given the option of adding some extra free statistics:  I generally turn these on because they're free and I haven't found any reason not to have them.  

(You could turn them off if you viewers complain that your feed is slow to work with, but it doesn't usually seem to happen.)


Next steps


Just creating a feed from Feedburner isn't actually very useful - your blog was already publishing feeds anyway.  The benefits come from using Feedburners tools to promote, manage and monitor use of your feed.   You can access these from the main Feedburner screen, which is where you are taken after your feed is made.  The options are grouped into the Optimize, Publicize, Moneytize and Troubleshootize tabs.   

Feedburner sometimes shows some "cute" phrases on the screen, and uses quirky words to describe things, eg "troubleshootize".   This is because the product was originally totally separate from Google and the company developed its own way of doing things.  When Google took over, some things become more standard, but this wasn't one of them.

There are lots of things you can do with your feed.  But the first and most important steps are:


Related Articles:


Components in your blog

Why an RSS feed is important to bloggers

The Follow-by-email gadget:  an easy way to make a feed from your blog

Making your Feedburner feed available on your blog

Making an email-subscription available on your blog

Providing social proof, by enabling the Feedcount button

Understanding Google accounts

Tools for applying copyright protection to your blog

Putting a Facebook "Share this" badge on your blog.

Hiding "Subscribe to Post (Atom)" at the bottom of your blog

/ Wednesday, May 4, 2011 /
This article explains how to remove the "Subscribe to: Posts (Atom)" item that appears at the bottom of Blogger blogs with Layout or Designer templates.

Where does "Subscribe to: Posts (Atom)" come from?


By default, Blogger puts the "Subscribe to: Posts (Atom)" item on at the bottom of every screen of posts in blogs with Layout or Designer templates (ref What type of template does my blog have?).

This is useful for readers who understand what it means:  it lets them subscribe to an RSS feed of your blog - and even if you don't personally use it, RSS is important for bloggers.  However:
  • Some readers won't understand what it means,
  • If you're showing a "blog-site" (ie a website created with blogging tools, rather than a classic blog), the command doesn't make sense, even though the idea of RSS subscription does
  • It looks ugly, and
  • RSS-savvy readers who aren't Blogger users generally look for the little orange square with radar bars, rather than an obscure, Blogger-specific, description of the link.

So you may want to remove it from your blog and replace it with a nicer-looking RSS-subscription button.


How to remove "Subscribe to: Posts (Atom)" from your blog:


2  Turn the Expand Widgets checkbox to ON (ie ticked)

3  Find this code in your template:
<!-- feed links-->
<b:include name='feedLinks'/>
4  Replace it with this code:
<!-- feed links
<b:include name='feedLinks'/>   -->

What you have done is to comment-out the code:  the "-->" is the "end of comment" command in HTML.

This approach is better than "hiding" the link by making it the same colour as your background (which could be seen as trying to hide things from the search-engines).  It won't have any negative effect on your blog's performance, and you can undo it very easily by moving the end-of-comment text back again.


Related Articles: 


The "follow by email" gadget: an easy way to add an email subscription to your blog

/ Tuesday, May 3, 2011 /
Blogger have made it very simple to offer an email-subscription to your blog, with the new "Follow by Email" gadget.  This article describes adding it to your blog, and how it works for your readers.


Previously, I've explained why RSS is important for your blog, and how to give your blog a subscribe by email option using Feedburner.

The Follow by Email gadget that Blogger provide makes this even easier:  you can add an email subscription option to your blog by following these steps:

How to add the Follow by Email Gadget

  1. Log in to Blogger
    Use a Google account with admin rights to the blog, and which you want to use to get statistics about your email subscribers.
  2. Go to the Design tab
  3. Select Add a Gadget in the area where you want to put the email subscription option
  4. Choose Follow by Email (it's current at the top of the list)
  5. Enter the title that you want displayed on your blog (initially it's "Follow by email")
  6. Press Save.
This puts the gadget onto your blog.  But there are two more things that you should do:
  • Check that your blog's RSS feed is enabled: it should be either "Full" or "Until Jump Break", not "None".  You need to do this because the Follow-by-email tool will only send out emails if your feed is turned on.   
  • Subscribe to it yourself- by entering your own email. 
    This isn't absolutely essential - the tool works even if you're not signed up to it.   But it's a good idea to try to see your blog from the reader's perspective.  
    And some items in your posts (eg slideshows or PowerPoint presentations) may not work as expected in the emailed version - and you won't know about it unless you're getting the emails.

What your readers see:


On Your Blog:

The Follow by Email gadget looks like this:

The title was set when you were adding the gadget:  you can change it by editing the gadget in the usual way.

The background colour, button colour, title underline and font are based on the settings for your template:  you can only control them by editing the gadget colours in your template.

You cannot put text immediately before our after the place where people can enter an email address:   though you could put a text-gadget before or after the Follow-by-email gadget.


When they enter an email address:

When your visitor enters an email address and presses Submit, a new window opens:


This window:
  • Welcomes them to Feedburner
  • Acknowledges their Google account, if they are logged in at the time - remember, not all your visitors will be Google users
  • Tells them about the feed that they are asking to subscribe to
  • Warns them that a confirmation message will be sent to the email address they entered 
    "will receive a verification message once you submit this form" and that "FeedBurner activates your subscription to ... once you respond to this verification message"
  • Asks them to solve a text-catpcha puzzle, to prove it's a real person (not a computer) setting up the subscription.
The colours, design and content of this window are totally controlled by Feedburner.  You can't influence them in any way.

After the anti-spam-test is successfully completed, a second screen opens.   This tells the reader that
Your request has been accepted! Please check your inbox for a verification message from “FeedBurner Email Subscriptions”, the service that delivers email subscriptions for <<your-blog-name>>. You will need to click a link listed in this message to activate your subscription. If you dont see a confirmation e-mail in a reasonable amount of time please check your bulk/spam folder.
Again, you have no control over the color, format or placement of this window, it is totally up to Feedburner.    You also don't control the message text, which many people are likely to ignore.


In their email in-box, today:

Your potential subscriber gets an email from Feedburner, usually within 2-10 minutes, asking them to click a link to complete the subscription process.
  • If they click the link, they become a verified subscriber.
  • If they don't click the link, then they stay on the subscribers list as unverified.
You can customize the "click the link to subscribe" message, using some fairly simply settings in Feedburner.  


In their email in-box, when you post:

On days when you have posted to your blog, every verified subscriber is sent one email message, with all your posts during the day.

The message may include the full post or just a summary, depending on what settings you have for your blog's RSS feed  (Settings > Site Feed > Blog Posts feed).

Feedburner provides a number of options for controling how this email looks, and when it is sent:  see the Publicize > Email Subscriptions > Email branding tab in Feedburner for these.    (full article coming soon).


More information about the gadget:

This new gadget has been widely requested, and is an exciting addition to Blogger.  But there are some challenges with it, which are discussed in Understanding the Follow-by-Email gadget.


Related Articles:


Why RSS is important for your blog,

An alternative to "Follow-by-email":  giving your blog a subscribe by email option using Feedburner.

Customizing Feedburners verification message

Putting a Picasa slideshow into a blog-post

Showing a PowerPoint presentation in your blog, as a slideshow

Understanding the Follow-by-Email gadget and Feedburner

/ /
The Follow-by-email gadget is built on top of Feedburner's email-subscription service.   It's very easy to add to your blog, but there are some things that you need to think about if you are using it to deliver posts to your followers by email.

Adding the "Follow by Email" gadget
Australia Post box The Follow-by-Email gadget is a very simple way to give your readers access to blog-updates by email: it delivers a message in their inbox every day that you post.

But to decide if it's a good thing to use, to get good value from it, and to troubleshoot any problems, you need to understand a little more about how it works.

And, since it uses Feedburner, this means understanding how Feedburner works.

What is Feedburner:

The Follow by Email gadget uses a product called Feedburner to manage the list of subscribers. 
This started as a tool to enhance the RSS subscribtions that website-owners delivered - see Why RSS / Subscribe to Posts is important for your blog  for info about RSS.   Very roughly speaking, every time a website publishes a new item, Feedburner adds that item to a "feed" or summary of the site, and tells all the subscribers about it, without the subscribers having to visit the website.

One option that Feedburner added was subscribe-by-email:  website owners who use Feedburner for this have to turn the service on, and then put "something" on their website that offers the service to people who want to get emailed updates.   To start with, Feedburner just kept a list of emails addresses, but now it's more sophisticated and checking with addresses that they really do want to be subscribed before adding them to the list, and offers un-subscribe option with each subscription email.

Adding the follow-by-email option to your blog sets this up for you:  it sets up a feed, turns the email service "on", and puts an email-capturing box onto your blog.   


What is set up when you add the gadget:

You put the Follow-by-email gadget onto your blog the same way you would add any other gadget.

This means that, you are logged in to a Google account at the time.

If that Google account already owns an entry (ie a "feed") in Feedburner for the blog you're adding the gadget to, then the gadget just uses this feed.

But if the Google account doesn't currently have an entry from the blog, then a new feed is created, and the email service is turned on for it.:
  • The Feed Title is based on the blog's name.  
  • The feed address appears to be fairly random (eg I created one for a blog called "Another test blog", and the feed name is    http://feeds.feedburner.com/blogspot/meaUW


Advantages of the Follow-by-email gadget:

This gadget makes it a lot easier to offer a follow-by-email option:  you don't have to set up the feed yourself, or use a HTML-gadget to provide a subscribe-by-email form.

And because it uses Feedburner, you have full access to Feedburner's statistics, and a number of other things that are included in Feedburner's features, including:

Disadvantages of the Follow-by-email gadget:

There are some disadvantages of both the gadget, and the approach that Blogger has used to implement it:
  • Google / Blogger have mixed up the words "subscribers" and "followers".  It used to be that subscribers used RSS gadgets (from Feedburner or other feed-providers), and followers used Blogger's own following-tools.   But this new gadget is called "follow-by-email", and it's possible that mixing up the ideas will make some people very confused.
  • Using the gadget, you have very little control over the look and feel of the  follow-by-email option on your blog.  

    Compare this to the "Get updates by email" option which is in the top of the sidebar on this blog:  I've put a lot of effort into getting the wording "just right" so potential subscribers know that they will be getting a please-confirm email.   This on-screen wording means that even if they don't act on the email immediately, they get another reminder about if they come back to the blog again in the future.
  • You have no control over the message that potential follow-by-emailers are shown to tell them to verify their subscription.  It looks like this

    While this message is fine for the tech-minded people who are likely subscribe to an RSS feed, it will probably bring a glazed look to those of your visitors who need a very simple subscribe-by-email option!  
  • People who subscribe to your blog by email don't see any of the widgets on your blog, or any advertisements.   (Unlike regular RSS-feed subscribers for whom you can set up AdSense for feeds).  Despite the options mentioned above, ou have very little control over how they see your messages, especially if they happen to be using email software that shows your messages in plain text.

Related Articles: 


Customizing the "click the link to subscribe" message
 
Getting a list of all your email subscribers

Why RSS / Subscribe to Posts is important for your blog

The Follow-by-Email gadget:  a very simple way to give your readers access to blog-updates by email

Customising Feedburner's email subscription messages

/ /
You can control the email-messages that Feedburner sends to people who have signed up for your blog's "subscribe by email" option.

Overview

I heart FeedBurnerPreviously I've described how to make a Feedburner feed and how to add the subscribe by email option to your blog.  

If you have added a subscribe-by-email feature, and a reader (who's not already subscribed to the email feed) enters their email address, then Feedburner will show a catpcha-text screen (to check that you're not a computer, maliciously submitting other people's addresses), and sent an email to the address, asking the recipient to confirm that they really do want to subscribe to your blog.

The 2nd email stops other people from signing you up as a subscriber to blogs that you're not interested in. 

But it means that some people who are interested in subscribing to your feed don't actually complete the process, because they don't understand what's going on, or miss the email (eg it goes to their spam folder).

You can deal with this by
  • Telling new subscribers that they are going to get an email, and what to do with it
    (see the "subscribe by email" option on this site for one way to do this), AND
  • Configuring the details of the email that is sent:  sender-address and message-text are both important for maintaining your blog's image, and ensuring that people click the link and complete their subscription.
The rest of this article is about the configuration options that are available.


Customising the subscription-link email message:

Log in to Feedburner, using the Google account that owns the feed you want to customise (remember, may not be the same Google account that owns the blog, especially if you are using AdSense to monetize your feed.)

Choose the Publicize tab

Choose Email Subscriptions from the menu on the left.

Choose the Communication Preferences option.   This opens options in the main window where you can edit:

The sender-address
  • The default value is the email address associated with the Google account that owns the feed.  But you can change it to any valid email address (and I suspect an invalid one too, if you like - I haven't tested this). 
  • It may be tricky to choose what email address to use:  the same one is used for both the subscription-activation email and for every other post-notification email that is sent by your feed.   An address that looks like a real person (eg mary@gmail.com) is less likely to end up in your potential subscribers junk folder.   But you may not want your personal email address to appear to your email-subscribers every time you post, especially if the blog is written by a team or belongs to a club or business.
  • If you change the sender-address sometime after your email-feed is set up, then some of your subscribers may stop getting messages because they only have the previous address, not the new one, on their friends list (whitelist).  If you're going to do this, be certain that the benefit of changing is worth losing a few subscribers over.
The text for the confirmation email.   
  • Google (or perhaps Feedburners original owners) have provided some standard text, which is used unless you change it.   
  • The tone of this is very informal, eg starting with"hello there" and (IMHO) irritating "we can't wait to send you updates".  You may want to change it to match the style and tone of your blog.
Press Save in the bottom left corner of the screen to save your changes.


Important:  Don't forget to press Save.   Currently you are not warned that changes will be lost if you navigate away (even just to the email branding sub-option) - but they are.


fyi, the Email Branding and Delivery Options links lead to other controls, which control the email messages that Feedburner sends when you send an items to your blog's feed.  They will be discussed in another article, because they're too complicated to go into here.


Related Articles: 


Understanding your Google account

Getting a list of your Feedburner email subscribers

How to make feed using Feedburner

Using the Feedcount widget to encourage new subscribers with social proof

Putting email-links into your blog

Giving your subscribers a free file (eg an eBook) using Feedburner

/ Tuesday, April 26, 2011 /
This article shows how to make an eBook (or any file) available to your blog's subscribers with Feedburner's FeedFlare tool.   It's written for Blogger users, but most of the information applies to anyone using Feedburner.

Feedflare, a no-maintenance tool for giving away files on your blog


A give-away is one approach to get readers more more connected with your blog:  if you give people something of value, they'll feel warmer and fuzzier towards you, and read your blog more often (so the thinking goes).

No matter what you are giving away, you need a way of getting it to your readers.   This can be more time-consuming than you think, especially if it's an on-going gift for lots of people, not just a one-off gift for one lucky reader.

But if you give away a file, then you just need a computer to do the work for you:  you can put a link on your blog either in a post (like this) or as a gadget (eg linked to from a Picture, or as an entry in a Linked-list gadget).

However you might want to get a bit more cunning, and only make the gift available to people who actually subscribe to your blog, because people who have subscribed are more likely to come back again.  This doesn't guarantee an on-going connection - some folks will subscribe, get the goodies and immediately un-subscribe.   But probably some will become long-term readers.

Feedburner's FeedFlare tool makes it easy to distribute a file to subscribers, using your feed, by:
  • Putting the eBook (or whatever file) somewhere
  • Making a FeedFlare script to show the book, and putting somewhere that it can be read (it's just a text file)
  • Telling your Feed to use the script
  • Telling (potential) subscribers how to access the eBook from your feed. 

    1 Put the file somewhere:

    • Load the file that you want to distribute to any file-host.
    • If the file-host that you use provides security (99.9% of them do), make sure that the access options are set to either "everyone" or "anyone with the link".
    • Make a note of the URL of the file on this system.  
    • Sign out of your file-hosting account and test that you can access the file even though you're logged out.  
      (Testing it at this stage means that you don't have to worry about it later.)
    There are lots of places where you can host files (hosting simply means storing them, usually with some rules about who is allowed to read and edit them.

    I tend to use Google tools because there are less likely to be compatibility problems, so I've been using either Google Docs, or a file cabinet page on a Google Sites site.


    2 Make a FeedFlare script:

    •  Use Notepad (or any other text-editor) to make a text file containing the following:
    <FeedFlareUnit>
            <Catalog>
                <Title>THE TITLE TO SHOW *YOU* IN FEEDBURNER </Title>
                <Description>Download the eBook</Description>
            </Catalog>
            <FeedFlare>
                <Text>THE NAME THAT YOU WANT SUBSCRIBERS TO SEE</Text>
            <Link href="http://URL OF THE FILE YOU ARE GIVING AWAY"/>
            </FeedFlare>
        </FeedFlareUnit>
    • Customize the text (the bits shown in bold) to the correct values for your file. 
    • This file is your FeedFlare script.  Save it to your computer as YOUR-FILE-NAME.xml  
      Note that it needs to be .xml, not .txt.   
    • Upload the script file to a file host (see the section before for options) from where it can be read as a text file.  
    Note:  In the past, I've found that Google Docs doesn't work for this, because when something tries to read the file it's "served" with a Docs header.   I don't know if it's still the case, but I generally use a filing-cabinet page in Googe Sites to store text files, just in case.
    • Set the access options for this file to are set to either "everyone" or "anyone with the link".
    • Make a note of the URL of the script-file.  
    • Sign out of your file-hosting account and test that you can access the file even though you're logged out.  
      (Testing it at this stage means that you don't have to worry about it later.)

      3 Tell your Feed to use the script:

      • Log in to Feedburner account, with the account that owns your blog's feed.
      • Click on your Feed, to see the details about it.
      • Go to the Optimize tab.
      • Click on Feedflare (currently in menu on the left hand side, under Services)
        The Official FeedFlare section gives you a number of options for adding social networking tools to your feeds.
        In the Personal FeedFlare section, enter the URL of the XML file with your script (ie the one you uploaded in section 2)
      • Click Activate (if you haven't been using Feedflare before) or Save (if you have)


      What your subscribers will see


      Once you have done this, future posts that go out in your feed (both emailed feeds and via feed-reader software) will have an icon at the bottom, labelled with the value you put in for "THE NAME THAT YOU WANT SUBSCRIBERS TO SEE".

      When a subscriber clicks on this link, your eBook (or whatever the fileis ) will download to their computer, and may open depending on their settings for downloaded files.   In Google Reader, it looks like this - you may want to test it in a few feed-reader tools, depending on what your readers use.


      Troubleshooting:

      • If the URL of your feedflare file, or your eBook file, starts with HTTPS:// , then take the "S" out, so it becomes http://...
      • If you already had Feedflare activated and are just adding a script, you may get an error message when you click Save.   Try changing one of the Official Feedflare settings at the same time as you add the script name.
      Note that the link to the file is not included in items that have already been sent out in your blog's feed, only in new feed items that are generated after the script is added.


      Tell your readers and subscribers how to access the file:


      Making the eBook available through your feed is only the first step in getting value from it.  You also need to:

      By edited by Felipe Micaroni Lalli
      (http://commons.wikimedia.org/wiki/File:Cc_.png) 
      [CC-BY-SA-3.0], via Wikimedia Commons
      Tell your subscribers that it's there and how to access it:
      These peole are already using a feed-reader or email subscription, they probably won't have difficulty clicking the link - once they know it's there.  But it may be worth telling them what type of software they need to use to open the file.

      Tell potential subscribers about it:
      Casual readers, now and in the future, need to know that if they subscribe, they will get access to the eBook.   How much detail you need to provide (eg telling them how to subscribe, explaining what subscribing means etc), depends on your blog's niche and how "subscription-savvy" your typical reader is.

      You may find that some readers need a very detailed explanation.  It's likely that there are some good articles about this on the net already, but I don't currently have any links - if you find one, please do leave a comment below.


      Acknowledgement and further info:


      This article was inspired by:
      • A post in ProBlogger which described how to implement a file give-away in a WordPress blog (where it is possible to upload files to the root directory, meaning that the process is a little simpler), and
      • A person in the Blogger Help Forum who asked how to do something similar in Blogger, at about the same time I read the Problogger article.
      Many thanks to them both.

      You can do more complicated things than this using FeedFlare:  see the Feedflare Developer's guide for more inforation.  Also, their first "Hello world" script is a useful tool if you need to diagnose if problems getting this approach to work are due to file-hosting or to the feed itself.


      Related Articles:


      Adding social networking tools to your Feedburner feeds

      File hosting options.

      Encourage new subscribers by enabling Feedburner's FeedCount button

      Adding social networking buttons to your Feed

      Adding Amazon Associates product links and banners to your blog.

      Labels

      Thank you for visiting my site. I’m the author of home decor help, home garden decor, home design interiors, tina 4 home design, uhozz, visit yogurt lab, sitazine, is beauty tips and sunnijati website. Modestop Topmodest Free Beauty Tips Shitazine Sitahouseblog Izhealthy Shitadesign Sitahouse Topmodest Sitazine Irezine Home- decor-design Shitadesign Shitadesign-dot-com Inhomeland inhouseland ghiuldenika inebautystyle enterarteiuna radiodominiopublico biberealexandru fabiobernadosdi geeklore31 syahadah-alhafeezah peaceloveiman bigwideempty techandchefadventures kaosgunlugu fikirkulubleri duazinciri theinternationalrules morefortngintn monkeymanzach lifeatthegreenys photokid84 chelsea-settles chasingmommyhood sexyhotactresseswallpaper tophotnewstodays avvani urbantrendsussex voychic reisyamode sitazine reportmy homedesignideasx mystylepinterest fashionstyleco popularnewstips isexy-hot-girls sexywomengirl trendymodeku derumahdesign womenhairs hackoblogger gadiswomen homeinteriordesignideas1s homedesignideasa uniquehomedesignsw enterpreneurforbloggers earningblogtipss lilyandgiasmom onfeatureblog aboutadsen onblogsocial tecnologiku onlinekutip akuhub caramakemoney youseoneed blogukus newbieblogit adsenseguideto triond-adsense inseoservice intipseoblog otherseoblog freeseoguid seoblognets tawaguideblog seosecretip buzdesign modewomen gayawoman cantikide tipsehat bebeautyps tipsjilbabcantiks idekontenislami healthfitnessnutritionsz jilbab-tips tips-home-decor caramemakaijilbabv beritaremajaterkinie allisoncrewnews mypinspinterest mypinspinterest gogirlsgallery seyhotgirls topmodest worldotgirls seksigirlsblog yourgirlsnet sexywomensia decorativehousedesigns simplebloggertipsz aboutadsense09s marketingner freeseotipstricksz womensiana chicstylegallery oblogkudewe colhomegallery marketserve onlibusiness artodesign designinguide oninteriorhome interiormu intutorblog blogoffeed newbloggerhint enginseo dibisnistips internetmublog onroomdesign homegardenco
       
      Copyright © 2010 New Blogger Tips, All rights reserved
      Design by DZignine. Powered by Blogger