Displaying a gadget only on static pages - or on everything except static pages

/ Friday, August 27, 2010 /
This article is about how to set up a gadget / widget in Blogger so that it is only visible on the "static" pages in your blog.

Note:  in Blogger, the words "gadget", "widget", and even "page-element" all mean the same thing - basically a bit of code that can be put into your blog without looking like code, and which does a specific thing.

I generally use "gadget", because the Page Elements tab currently says "Add a Gadget".  But they're absolutely the same.


Making a gadget that only shows on static pages:

1   Make the gadget
Do this in the usual way, using Design >  Page Elements > Add a gagdet.


2   Drag-and-drop the gadget to the place where you want it.
A popular place for a gadget that is going to look like a "home page" is in the Body section, just above the Blog Posts gadget, where "Test Gadget" is in this example:


3  Edit the Gadget again


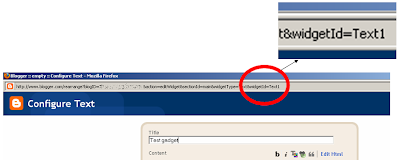
Don't make any changes to it - just maximise the window, so you can see the WidgetID, which is at the very end of the address bar at the top.


Make a note of the value.   (In this example, it's Text1).


4  Find the code for your gadget and edit the template:


Edit your template  (Design > Edit HTML)

Download a copy of the template, and put it somewhere safe.

Use your browser's text search tool (Edit / Find in Firefox) to look for the widget name that you noted in step 3.  Notice what comes after it.   In this example, it's the line for Blog1:
          <b:section class='main' id='main' showaddelement='no'>
<b:widget id='Text1' locked='false' title='Test gadget' type='Text'/>
<b:widget id='Blog1' locked='true' title='Blog Posts' type='Blog'/>


Click the checkbox (so it's turned on)

After the expanded template has downloaded, find the widget name again.  This time it will look a bit longer (the exact details depend on what type of widget/gadget it is.)

  <b:section class='main' id='main' showaddelement='no'>
<b:widget id='Text1' locked='false' title='Test gadget' type='Text'>
<b:includable id='main'>
  <!-- only display title if it's non-empty -->
  <b:if cond='data:title != &quot;&quot;'>
    <h2 class='title'><data:title/></h2>
  </b:if>
  <div class='widget-content'>
    <data:content/>
  </div>

  <b:include name='quickedit'/>
</b:includable>
</b:widget>
<b:widget id='Blog1' locked='true' title='Blog Posts' type='Blog'>

5   Add conditional formatting:
You need to put conditional formatting code around the code for the gadget - makings sure that it doesn't go around the code for anything else!  (which is why you noted what comes afterwards in step 4)

The code to use is:
<b:if cond='data:blog.pageType == "static_page"'>
THE CODE FOR YOUR GADGET GOES IN HERE

</b:if>

The example above looks like this, when the code has been added:
          <b:section class='main' id='main' showaddelement='no'>
<b:widget id='Text1' locked='false' title='Test gadget' type='Text'>
<b:includable id='main'>
  <b:if cond='data:blog.pageType == "static_page"'>  <!-- only display title if it's non-empty -->
  <b:if cond='data:title != &quot;&quot;'>
    <h2 class='title'><data:title/></h2>
  </b:if>
  <div class='widget-content'>
    <data:content/>
  </div>

  <b:include name='quickedit'/>
</b:if></b:includable>
</b:widget>
<b:widget id='Blog1' locked='true' title='Blog Posts' type='Blog'>

ALTERNATIVE:
If you want the gadget to appear on every page except static pages, use is

<b:if cond='data:blog.pageType != "static_page"'>
THE CODE FOR YOUR GADGET GOES IN HERE
</b:if>
See the slight difference:    !=     instead of   ==


NOTE:  
Copy and paste is the best way to transfer the code.  If you must type it in yourself, be very careful about what's a single quote mark and what's a double quote mark.


6  Check that it's worked
Preview your blog before you save the changes:  check that the the widget is visible.

Save the template changes, and look at your blog.  Check that
  • The widget is, or is not, on static pages (depending on what option you chose)
  • The other elements of your blog (other widgets, blog post titles, dates and contents) are all as you expect them - on the first screen, and on other screens too.

If anything is wrong with how your blog is working, go back to the template editor (Design > Edit HTML), and upload from the copy of your template that you made at the beginning of step 1.   This will let your blog work properly, while you figure out what went wrong.


Related Articles: 


Static Pages in Blogger

Controlling what goes on the homepage

Showing a gadget only on the home-page.

Adding a Tweet button to your Blog

/ Saturday, August 14, 2010 /
This article is about Twitter's tweet-this button, and how you can use it to let your readers tweet your posts.  

It's aimed at Google Blogger users, but most of it applies to other blogging (eg Wordpress, TypePad, etc) and website tools.

Background

Twitschervogel01 derived from twitter-tOften bloggers want to give readers a tool to share the blog-post that they are reading via Twitter, on the readers own Twitter account.   I call this way of linking your blog to the social networking sites "Look what s/he said" (ref:  Linking your Blog and the Social Networks).

Your readers could just copy-and-paste a hyperlink to your page, but it's clunky:  they have to start up Twitter, themselves, and some won't know that Twitter automatically shortens links.

There are various 3rd-party widgets to put a "twitter-ish" icon on your blog, set up so that when a reader clicks it, the current page it is automatically tweeted.   But I've explained before why I don't like third party gadgets for Facebook, from both a security and maintainability point-of-view, and the same reasons apply to Twitter.

Google have social-media buttons which can be shown at the bottom of each post.   They're an improvement on the 3rd party gadgets, but I don't like the way they look, and the lack of options to customize them, so I usually turn off.


A better approach: Twitter's official Tweet button
Twitter now offer a share button on their resources page.   (You don't need to be logged in to twitter - or even have a Twitter account yourself - to use it.)

This lets you customise the layout and (optionally) suggest two Twitter accounts that your readers might like to follow in future.   You install HTML code provided anywhere in your blog (etc).

You can see an example of this gadget at the top and bottom of this article, in my custom social sharing bar.


Follow these steps install a Tweet button on your Blog as a gadget:

1  Go to the Twitter resources page.
(You don't have to be logged in to Twitter to do this - in fact, you don't even have to have a Twitter account.)

2  Select Tweet Button

3  Set the options you want.  Currently there are separate (horiztontal) tabs for
  • Counter: none, horizontal or vertical.
  • Tweet-text:  either the title of the page the gadget is on (by default) or some other text that you enter.
  • URL:  The page that the button is on, or some other URL that you enter.
    Important:  If you want readers to tweet about individual posts, not your whole blog, then put some text that you will find and change later (eg FIX-UP-URL) here.    See the section below about Twittering Posts vs your Whole Blog for more information about this.  
  • Language:  the language that the button is in on your website


Recommend people (Twitter accounts) to follow - if you enter a Twitter account here, then it will be suggested to readers who click on your gadget.  You can suggest up to two accounts.   If you are logged in to Twitter when you make this gadget, then your account will be automatically filled in here, but you can change it.

Preview your button  (don't click anything, just check it out in the bottom left of the window - notice that it tells you the size, in pixels, of the button you've selected)


Copy the HTML from the box.

7  Go to Blogger, and add the HTML to your blog, using one of the standard options for adding externally-sourced HTML to your blog.  
Except - if  you chosen the post-specific-URL option in step 3,  you must
Change:    data-url='FIX-UP-URL'      to     expr:data-url='data:post.url'
and make sure you add the code to a post-specific place in your blog.

8  Save the change and the view your blog.   Test the new gadget (does it look right, does the right thing happen when you click it).


Twittering a post vs your whole blog:

If you put a Tweet button into your own blog as a gadget, then what is shared is your whole blog, not the particular Post that is being read.   
For example   http://blogger-hints-and-tips.blogspot.com   (this blog)
instead of      http://blogger-hints-and-tips.blogspot.com/2010/04/tools-for-linking-blogger-and-social.html  (a post)

But if you want your readers to tweet individual posts, you need the Tweet-button to appear with EVERY post.  This is because some screens show multiple Posts, and unless the button is linked to a specific post it doesn't have a specific URL to share.   Unfortunately it's true even if you have your blog set up so that only one Post shows at a time.   It is a bit harder than adding it as a gadget, because you need to edit your template and put the code into a post specific location.   This article explains the options for locations that are inside posts, and where to put the code.


What your readers see


When a reader clicks the NUMBER in your Tweet gadget:

They are taken to a screen showing the results of searching for your post/blog in Twitter:  if other people have Tweeted the same post, they will be able to see who tweeted it, and what replies were generated.


When a reader clicks the BUTTON in your Tweet gadget:

They'll be asked to log in to Twitter, unless they're already logged in.


Then they see a window where they can
  • see the shortened link and text that they're going to be sharing, and
  • change it, and 
  • choose whether to follow the recommended Twitter account(s)


The shortened link is to either the page that they were viewing when they clicked the button, or another URL (if you chose Custom URL when you were setting up the gadget).  The text is the title of the post, or some other text if you entered some when you were settin gup the gadget.

Both the text and the shortened-URL can be changed by the reader before they share the Tweet.


Related Articles:


Linking your Blog and the Social Networks

Why I don't like third party gadgets for Facebook

Options for putting third-party HTML into your blog

Putting a Share this on WHATEVER button into Blogger - includes info re post-specific locations

Planning changes to your blog - in private

/ Monday, August 9, 2010 /
This article is about how to make major changes to your blog with a minimum of disruption for your readers.


If you are making big changes to your blog (eg switching to a Designer template), then there is likely be to a time-period when your blog looks strange:  some of the changes will be done, some won't, and maybe some key features won't look right.

Many people look for a way to re-direct their blog or to display a temporary vacation-notice ("closed for maintenance, come back soon") while they make the changes.

However the only option that Blogger has is making the entire blog private (Settings > Permissions > Blog-authors-only).   This isn't really suitable, though, because it just shows prospective readers a standard message saying that the blog cannot be accessed, without explaining why.  It may even harm your blog's reputation, if someone influential happens to look at it just at the wrong moment.

Since there is no other work around (except for blogs with a custom-domain - see the last section of this post), Blogger administrators have to plan their changes carefully, and put them in place quickly.


Plan carefully, and make the changes quickly


If you blog has a .blogspot URL, or if you don't like the alternative suggested below, then the only option is to plan your changes very thoroughly so you can minimise the time that your blog is in transition.

The first step in planning is to make a private testing blog that's like the real blog (except perhaps it only has 2-3 dummy posts instead of your real conent).

Work out exactly what changes you need to make, and the exactly details of how to make them.   Use the test blog, not your real one, to do all your research, experiments etc.

Keep a list

So you know exactly what changes need to be made.
When I did this recently, I used Excel because I'd used it to find the difference between two template files.  But there are many other suitable tools, ranging from the back of an envelope on your desk to a draft post in your blog, or even a full-blown change management system.

Prioritize

Sort the list so that the changes that must happen first are at the top,and the things that aren't so important are at the bottom.
What's important to you may be different from what's important to your readers:  when I did changes to my local site, re-installing Google Analytics was the first thing to do after changing the template, because collecting statistics is very important to ME.   But if I'd been totally reader-focussed, I'd have done things last, and done all the things that readers see first.

Combine things:

Consider whether some items on the list can be done at almost the same time
Eg if you need to customise the template for several items on the list (eg center the heading, hide the navBar), and all the customisation can be done by entering new CSS rules then these can all be done at the same time.

(These two steps may give conflicting results:  but if you prioritise first you'll be able to make good decisions about what's most important.)

Choose a time of day

Choose the best time to make the changes.  This could be when your blog has a relatively low number of visitors, or you may use some other criteria.
For a blog that's used by people in my city, I chose 12-midnight when very few people are interested in the topic.  But for Blogger-hints-and-tips I chose 9am (local-time for me is Western European time) because most readers are 4-8 hours behind my time zone.

Warn your readers

Some people recommend making a temporary post telling readers that you're making changes and apologising for things looking strange.   There are cases when this would be a good idea, but overall I'm not convinced:  most of your readers probably won't visit while you're making the changes - except that a post like this going out on your RSS feed might just encourage them to visit now to see the new look.    And readers who get to your blog via search and go straight to an older post may not see the post anyway.


Do the changes, quickly

Work fast, but be careful and methodical too:  work through your list, and tick off items as you go.  If you have an brilliant ideas about what else you could do, resist them at least until you've got your core blog features working correctly with the new look.


An alternative for custom-domain blogs


If your blog is published to a custom domain, you could:
  • Prepare a temporary "come back tomorrow" message using another tool (eg Google Sites - or even just another blog with only one post)
  • Switch your main blog back to published on Blog*Spot
    (Setting > Publishing > Switch to Blog*spot)
  • Re-direct your temporary message (site/blog etc) to use the custom domain
  • Do the changes to your blog
  • Undo the redirect for your temporary message
  • Re-publish your blog to the custom domai

Of course this won't work for people who navigate directly to one of your posts instead of going to the blog and itself (eg to http://blogger-hints-and-tips.blogspot.com/2010/07/coverting-ms-word-documents-to-blogger.html instead of http://blogger-hints-and-tips.blogspot.com/) - if you get a lot of visitors from Search, then they probably enter your blog this way.

Also, if things go wrong during the re-direct processes it could take a bit longer than you planned to resolve the registry entry problems.   (Things don't usually go wrong, but it may not be worth the risk.)


Related Articles


Switching your blog to use a new Designer template

Making a private blog for testing template changes

Comparing two template files, using Excel

Labels

Thank you for visiting my site. I’m the author of home decor help, home garden decor, home design interiors, tina 4 home design, uhozz, visit yogurt lab, sitazine, is beauty tips and sunnijati website. Modestop Topmodest Free Beauty Tips Shitazine Sitahouseblog Izhealthy Shitadesign Sitahouse Topmodest Sitazine Irezine Home- decor-design Shitadesign Shitadesign-dot-com Inhomeland inhouseland ghiuldenika inebautystyle enterarteiuna radiodominiopublico biberealexandru fabiobernadosdi geeklore31 syahadah-alhafeezah peaceloveiman bigwideempty techandchefadventures kaosgunlugu fikirkulubleri duazinciri theinternationalrules morefortngintn monkeymanzach lifeatthegreenys photokid84 chelsea-settles chasingmommyhood sexyhotactresseswallpaper tophotnewstodays avvani urbantrendsussex voychic reisyamode sitazine reportmy homedesignideasx mystylepinterest fashionstyleco popularnewstips isexy-hot-girls sexywomengirl trendymodeku derumahdesign womenhairs hackoblogger gadiswomen homeinteriordesignideas1s homedesignideasa uniquehomedesignsw enterpreneurforbloggers earningblogtipss lilyandgiasmom onfeatureblog aboutadsen onblogsocial tecnologiku onlinekutip akuhub caramakemoney youseoneed blogukus newbieblogit adsenseguideto triond-adsense inseoservice intipseoblog otherseoblog freeseoguid seoblognets tawaguideblog seosecretip buzdesign modewomen gayawoman cantikide tipsehat bebeautyps tipsjilbabcantiks idekontenislami healthfitnessnutritionsz jilbab-tips tips-home-decor caramemakaijilbabv beritaremajaterkinie allisoncrewnews mypinspinterest mypinspinterest gogirlsgallery seyhotgirls topmodest worldotgirls seksigirlsblog yourgirlsnet sexywomensia decorativehousedesigns simplebloggertipsz aboutadsense09s marketingner freeseotipstricksz womensiana chicstylegallery oblogkudewe colhomegallery marketserve onlibusiness artodesign designinguide oninteriorhome interiormu intutorblog blogoffeed newbloggerhint enginseo dibisnistips internetmublog onroomdesign homegardenco
 
Copyright © 2010 New Blogger Tips, All rights reserved
Design by DZignine. Powered by Blogger