Finding the Web Property ID & tracking code for an existing Google Analytics profile

/ Saturday, October 15, 2011 /
This article shows how to find the Google Analytics Web Property ID for a website that you have previously set up in Analytics.


Google Analytics and websites

Previously, I've explained how to set up Google Analytics for blogs made in Blogger, and shortly I'll be releasing another article about how Analytics is affected by the recently introduced dynamic templates and mobile blogger templates.

But if you have already set up Analytics on for your site, then you may need to find your Analytics Web-property-ID and/or tracking code..


Analytics:  New vs old interfaces.
Like Blogger, Analytics has a new interface coming.  You get to their with the "new version" link, in more-or-less the same place as Blogger's "switch to new interface" link.   However the new-look Analytics still has the word Beta (meaning "still being tested" in its logo), so for now these instructions apply to "old Analytics". I'll update them when the time seems right.


How to find your Web Property ID

1    Log in to Analytics, using the Google account that owns the Analytics profile that you want to get the ID for.

2    Choose the Analytics Settings tab
Currently the link for this is in the orange stripe at the top left, just under the Analytics logo.

3   Find the entry in the list for the Analytics profile that you need the profile for:

Each profile has two rows:  the top one lists the URL of the site and profile ID, while the 2nd one has the name you have given the profile, view report-link, some statistics, and links to edit or delete the profile.

Only 10 profiles are listed on the screen, so if you have set up more profiles than that, you may need to use the "next page" links at the bottom right of the screen.if you have set up Analytics for a few different sites, you may need to

The web-property-id is shown beside URL address of the website that the profile is for, like this:


How to get your Analytics tracking code 

Follow the steps above for finding your web profile ID.

Click the Edit link in the row for the profile you are interested in.

This takes you to the Profile Status screen.

Click the Check Status link near the top-right side of the profile display.


This opens the Profile Settings screen, which you can copy and paste your code from.

(This screen also has an Advanced tab, which covers options that are not relevant to the vast majority of Blogger users, so will not be covered here.)


If you use AdSense as well:

If you use Analytics to track your AdSense performance as well, then you may also need to get the code to enable to this.    To find this code

  • Go back to the Profile Status screen (listed above)
  • Click the Edit link (in the grey bar, just underneath the Status link)

This opens the Edit Profile Information screen, where you can edit various characterisitcs.  Your AdSense code, which should be put just before or after the other Analytics code, is shown at the bottom of the screen.


Next:
If you haven't used Analytics on your blog previously, see setting up Google Analytics for your blog for advice about where to put your code in Blogger.

If your blog is made in Wordpress, then I understand that you cannot install the HTML directly, you will need to locate a suitable 3rd party plugin that you can add your code and or web-property to.


Related Articles: 


Understanding Google accounts

How the data in Blogger is organised

AdSense and AdWords - understanding the difference

Installing 3rd-party HTML into your blog

Setting up Google Analytics for your Blog

Not showing any posts on your blog's home page

/ Wednesday, October 12, 2011 /
You can set your blog up so that no posts are shown on the main screen - provided you have used some of the other "home page" aproaches to give readers other ways of getting to your content.

A blog with no posts is like a pub with no beer?

Blue Bull, Sneem - geograph.org.uk - 889696Previously I've explained how to only show one post on the main page - and this explanation looked at the types of screen that your non-dynamic-template blog can have (main, label, archive, post, and page).

But some people who want to give their blog a home page want to go further than that, and not show any posts on the main screen at all.   (Remember, the main screen is where people who navigate to your blog, rather than to posts within it, go.)

This sounds like a strange thing to do - after all, blogs are about posts.

But actually it's fine, provided you use some other tools to let readers move around the blog.  I've made a 150+ page blog this way, and it works very nicely because I have organised the information and used of "key" pages (lists of bus-routes, suburbs, shopping centres, etc) with tables that link to many other posts.


How to show no (ie zero, 0) posts on the main screen?

Some people want to do this, as part of the process of giving their blog a home page.  Again, it's not possible (at the moment, anyway) using Dynamic templates, but can be done with others:

In Blogger-2011:
  • Choose the Options drop down from the main menu, 
  • Choose the Settings > Posts and Comments panel from the left sidebar.  
  • Enter zero (0) into the Show at most field
  • Click Save Settings in the top right hand corner of the screen.

In the pre Sept-2011 Blogger:
In this interface, you can change posts-per-page on the Settings > Formatting screen to 0, and it works  nicely.

Unfortunately the Design > Page Elements > edit Blog Posts screen doesn't accept 0 as a valid value, so if you later need to change something on it, you need to:
  • Change it to 1 on the edit Blog Posts  screen
  • Make the other changes you need to make on that screen
  • Save the changes
  • Use Settings > Formatting to change posts-per-screen back to 0, 
  • Save again.

Doing this means that there is a slight period (maybe a minute or two, depending on how fast you are) when your blog will show a post on the main screen.   But this is a problem that most people can live with.

What your readers see: 
Unless you take steps to avoid it, your readers will see a grey box saying "0 Posts" when they look at your blog's main URL.   Some of the things you can do to avoid this include hiding the "showing posts with label XXX" message, and creating a gadget that only shows on the "home" page.


Related Articles:


Limiting your blog to only have one post on the main page

Giving your blog a home page

What are dynamic view templates?

Blogger template types
.
Using tables in your blog

Displaying a gadget only on the home page

Making every post appear on a separate page

/ /
You can set your blog up so that only one post is shown at a time - provided you don't use a Dynamic template, and you don't use Label or Archive pages.

One Post per Page?

One options that confuses some people is how to set up their blog up so that only one post shows up on each "page" or screen of their blog, and there is a complete break between the posts.

This is fairly easy to set up, you just need to understand a little about the types of screens that Blogger uses to display your posts, and how they can be manipulated and used - or importantly not used.

Most people refer to the screens that their blog as "pages".   However I try not to use that word, because the Pages feature in Blogger is quite different.  See "The Difference between pages and posts" for more about this.


The types of screen in your blog:

If your blog has a Designer or Layout template (ref  What templates does my blog have) then Blogger offers these major "views" of it:
  • The main screen
  • The posts-by-label screen, which shows all the posts (or the most recent however-many posts) that have a label that you or the visitor selects
  • The posts-by-archive screen, which shows all the posts (or the most recent however-many posts) made in a time-period that your visitor selects
  • The pages screen, which shows only one page at a time
  • The post screen, which shows only one selected post at a time.

Visitors see the post  screen when they navigate to the URL of an individual post.   In Blogger-HAT, for example, most visitors are from a search engine or a referral from the  Help Forum.   These people always follow a link to a specific post, so they see the post-screen showing only that post.

You cannot control how many posts are shown on the label or archive view - that is simply not how these screens work.

Similarly, you don't have full control how many posts are shown on the main screen:   you can make a suggestion (up to 500), but Blogger's auto-pagination rules decide how many post are actually shown, and how many are behind the "older posts"link.

But, you can set your blog up so that only a single post is ever shown on the main screen.  And if you do that, you may want to

  • not use the Labels gadget (which shows the posts-by-label screen) 
  • not use the archive gadget (which shows the posts-by-archive screen)

because these screens always show more than one post-per-screen.


How to show one post at a time on the main screen:

In Blogger-2011:
  • Choose the Options drop down from the main menu, 
  • Choose the Settings > Posts and Comments panel from the left sidebar.  
  • Enter one (1) into the Show at most field
  • Click Save Settings in the top right hand corner of the screen.


In pre-2011 Blogger:
  • Either  Go to Settings > Formatting, and set Show at most X posts on the main page  to 1
    OR
    Go to Design > Page Elements > edit Blog Posts,  and set Maximum posts per page to 1
  • Click Save Settings in the bottom left corner of the screen.

(Yes, these commands both talk about "page", but they mean "the main screen".)


Related Articles:


Blogger template types
.
The difference between pages and posts

Removing dynamic templates from your blog

Adding a separator line between posts

How to cut, copy and paste if you don't have an Edit menu

Putting Posts into your Pages in Blogger

Using Excel to make the HTML for the "body" of a table

/ Friday, October 7, 2011 /
This article is about how Excel's text functions can be used to make the HTML statements to put inside the body section of a table.   It's written with Blogger users in mind, but applies to anyone who needs to create a large HTML table.   Two Excel example files are provided, one using CSS and one not, which have some formatting included.

HTML table code


Previously I've described tables in your blog:  why you might want to use them, and some options for making a table,

These include using a HTML-code-generator to get the "skeleton" of the table.   With this approach, the hardest part is putting the table content (ie the words, numbers and pictures) into the correct place in the HTML, so that it appears in right cell in the table.

This is easy enough for a small table.   But if you want to make a table with  more data (eg I recently posted a book-index with 100 rows by 5 columns), it can be a little tedious.    Even if you prepare your posts in private (which lets you save frequently without worrying about auto-save), it can still be very hard to make sure that you put the right contents in the right cell.   And because Blogger's post editor doesn't handle tables well, it can sometimes do unexpected things to them,.

But there are some alternatives.


Tools for creating the "body" section of HTML table statements


I'm sure that lots of people have written custom applications that take a text file and turn it into HTML.   (Though when i googled, the first SERPs included a program for Win 3.1 / 95, which most people gave up on a long time ago!).

Many programs like Excel, Word, etc now have an option to save as HTML - so you could just use look at the file they make with a text editior (eg Notepad), and take the relevant bits.   That said, they usually include a lot of extra code, eg for fonts, layouts etc, so you may get more than you bargain for.

Commercial web development packages, eg Dreamweaver, may have table editing tools - however  many people cannot justify the cost of buying and learning them for smaller jobs.

Another option is to use Excel to manage your table of data, and use it's text-string manipulation functions to turn it into valid HTML code.   This isn't as hard as it sounds, especially if someone else does the initial formulas for you.


Excel Templates for making HTML


First version - 

cell level formatting - no CSS
sheet music
Second version

 with CSS styles

The first template was made before I understood CSS:  it uses text-functions to put formatting code into every single table cell - though you can just leave things blank if you don't want them formatted.  It may be best to use if you don't understand CSS.

The 
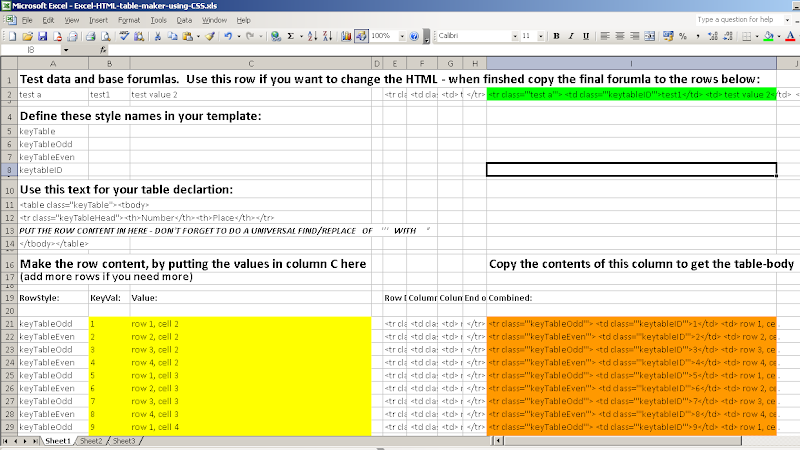
second template uses CSS styles to format the table.   This means you can change the formatting of all the tables in your website just by changing the CSS rules, ie you don't have to edit each individual table.   The Excel file lists the  CSS styles you need to define, and the names (eg keyTableOdd for odd numbered rows) show what each style is used for.

picture of Excel spreadsheet, data ranges have different colours
Version 2:  the formula area is green,
the input area is yellow, and the output area is orange

To use these templates:


1  Download the template


2  Check the formatting settings in the template.  Set up CSS styles in your website if you are using the 2nd version.


3  Create table header and footer statements yourself, or by using an HTML table generator.


4  Adjust the Excel template, so that
  • the number of rows and columns in the data area is what you need,
  • the formulas in the output area are right for your chosen rows and columns

    The section below explains the types of formulas used:  you can model new forumlas (for new columns) on the current ones, and new rows can be made by copying the formulas from an existing row.

5  Put the data for your table into the data area in the spreadsheet


6  Copy the text from the output area, paste it into a text editior (eg Notepad)


7  Use the text editor's Find/Replace function to change all cases of three apostrophes in a row (ie ''') into double quotes.


8  Copy the changed text from your text editor into the "body" section of your table statement.


This sounds like a lot of work but I've found that even if a table is only 10 rows long, using a HTML-generators-spreadsheet is a lot more efficient than trying to type the values into it row-by-row.


Understanding the Excel templates


I'm assuming that you understand a little about how Excel stores data in cells, and refers to those cells by their Row/Column combination, eg "E5" - if not, check out an Excel tutorial before reading on

Also, you need to understand the ideas of copying formulas between rows, and the use of relative co-ordinates in them to make sure that each new row or column picks up the right values. Again, an Excel tutorial would be a good idea if you're not familiar with copying formulas.

As well as these general ideas, there are here are two Excel concepts that are the basis of these templates:


1   Text concatenation functions

Excel has a wide range of functions that are used to glue strings together, or to pull them apart.   Important ones used in these templates are:

= "whatever"   puts a text-string with the characters whatever into the cell
= a1 & b1   combines the text strings in cells a1 and b1   (b1 goes immediately after a1)
= "This is A1: " & a1 & ".   This is B1: " & B1 &"."

The third function combined the two first ones.   It makes a text string like     "This is A1: AahOne.   This is B1: BeeOne."

Notice that it is a bit fiddly:   there are spaces inside the text-strings, and a full-stop at the end, so that the output looks sensible.   To make it easier to read, I've put the conent that's inside double quotes (ie "  ") on a pink background.

Once you understand this type of formula, though, it's not a big jump to formulas like these which combine HTML commands and values from the cells in the spreadsheet.

="<tr class='''"&A21&"'''>"
=" <td class='''keytableID'''>"&B21&"</td>"
=" <td> " & C21 & "</td> "
=" </tr>"
=E21&F21&G21&H21

This uses a step-by-step formula creation, which makes the parts of the final statement, then glues them all together in the last formula..


2   Putting an Excel special character in the output:

HTML needs to have double-quote characters around things that should be shown as text - for example
<a href="A-FILE-URL">Anchor-text</a>

However in Excel, the double-quote is used to show the beginning and end of text strings.

At first , this may put people off using Excel,   But there is a very simple way around this:
  1. Use another (set of) characters that don't appear in the table instead, and
  2. Before you use the the generated code, use a text-editor (eg Notepad) to change them to the required special characters.


Other ways to make table contents


There are lots of other ways to make the table-contents HTML code.
  • Using MS Access would probably be eaiser (but lots of people don't have it). 
  • Using Google Docs - spreadsheets is free, but I haven't tried out the string functions yet.
  • GreenLava of BloggerSentral has recently recommended Tabelizer:  I haven't used this myself yet, but it also looks promising.

What other options can you suggest?


Related Articles:


Why use tables in your blog

Get your posts right before you share them with the word.

Adding a new CSS formatting rule to your blogs' template

Putting HTML into your blog

Understanding Google accounts

File hosts - places to store files you use

Labels

Thank you for visiting my site. I’m the author of home decor help, home garden decor, home design interiors, tina 4 home design, uhozz, visit yogurt lab, sitazine, is beauty tips and sunnijati website. Modestop Topmodest Free Beauty Tips Shitazine Sitahouseblog Izhealthy Shitadesign Sitahouse Topmodest Sitazine Irezine Home- decor-design Shitadesign Shitadesign-dot-com Inhomeland inhouseland ghiuldenika inebautystyle enterarteiuna radiodominiopublico biberealexandru fabiobernadosdi geeklore31 syahadah-alhafeezah peaceloveiman bigwideempty techandchefadventures kaosgunlugu fikirkulubleri duazinciri theinternationalrules morefortngintn monkeymanzach lifeatthegreenys photokid84 chelsea-settles chasingmommyhood sexyhotactresseswallpaper tophotnewstodays avvani urbantrendsussex voychic reisyamode sitazine reportmy homedesignideasx mystylepinterest fashionstyleco popularnewstips isexy-hot-girls sexywomengirl trendymodeku derumahdesign womenhairs hackoblogger gadiswomen homeinteriordesignideas1s homedesignideasa uniquehomedesignsw enterpreneurforbloggers earningblogtipss lilyandgiasmom onfeatureblog aboutadsen onblogsocial tecnologiku onlinekutip akuhub caramakemoney youseoneed blogukus newbieblogit adsenseguideto triond-adsense inseoservice intipseoblog otherseoblog freeseoguid seoblognets tawaguideblog seosecretip buzdesign modewomen gayawoman cantikide tipsehat bebeautyps tipsjilbabcantiks idekontenislami healthfitnessnutritionsz jilbab-tips tips-home-decor caramemakaijilbabv beritaremajaterkinie allisoncrewnews mypinspinterest mypinspinterest gogirlsgallery seyhotgirls topmodest worldotgirls seksigirlsblog yourgirlsnet sexywomensia decorativehousedesigns simplebloggertipsz aboutadsense09s marketingner freeseotipstricksz womensiana chicstylegallery oblogkudewe colhomegallery marketserve onlibusiness artodesign designinguide oninteriorhome interiormu intutorblog blogoffeed newbloggerhint enginseo dibisnistips internetmublog onroomdesign homegardenco
 
Copyright © 2010 New Blogger Tips, All rights reserved
Design by DZignine. Powered by Blogger