Lining up the first post and the sidebar

/ Monday, August 22, 2011 /
In some Blogger templates, there is a big gap between the bottom of the header and the start of the first post, and this means that the posts and the sidebar are not aligned.  This article explains how to adjust the gap, and so remove that problem.


Blogger template layouts

Isométrica a04In the templates that Blogger provides, as well as all third-party templates, the amount of space between elements on the screen is not accidental:   designers put a lot of effort into working out what spacing will look good, and then finding ways to put CSS code into the template so that the spacing they want is shown in any browser software that Blogger supports.
But there are times when you may want to change this spacing, and this is easy to do, provided you are willing to accept the disadvantages of editing your template, and if  you can work out exactly which part of the template code to change.


The pre-Header gap

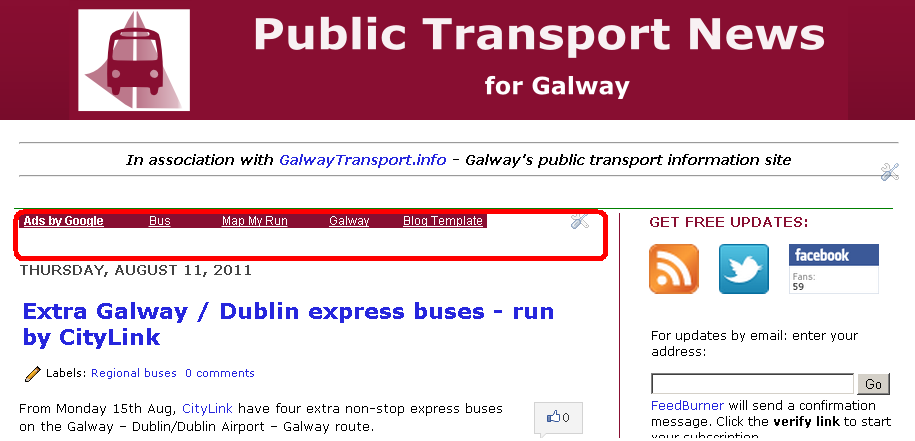
A pet-hate of mine is the blank space above the first post, which looks strange unless you put something else in to the space.  In this example, I've got an AdSense link-unit in the area highlighted in red, just to fill in the empty area:


How to change this

1  Edit your template  - don't forget to take a backup.


2  Find this code  (use the text-find feature in your browser, eg ctrl/f in Chrome to make finding it easier)
h3.post-title, .comments h4 {
  font: $(post.title.font);
  margin: .75em 0 0;
}
The exact numbers used in your template may be different:  the key thing is to find the CSS command that is putting a margin above the post header.  In the template that I took this example from (Simple), it's the "0.75em" - which puts 75% of the space of a the post-header characters as a blank space above the header.


3   Change the first margin value:  how much to change it by depends on your template, but in some cases I've used 0 successfully.

In CSS, when a margin statement has three numbers beside it, they refer to the

  • top, 
  • left-and-right, 
  • bottom 

margins respectively.   So if you want to do something else to the post-header, eg indent it, this is the place to make changes


4   Click Preview to see what the blog will look like - keep doing this until you get the right setting.


5   When you are happy with the spacing, click Save Template to apply the changes to your blog.   (Or Clear Edits if you cannot get it right and need to stop trying).


Note:  If you make a big change to your template like this, it would be a good idea to check out out in at least one version of the other browsers that your readers use - at the moment, this usually means Internet Explorer 8, Firefox and Chrome.   But it may depend on your niche - a tool like Google Analytics will give you some statistics about what browsers, and screen sizes, your visitors have.

Also, it is possible to make this change by just installing a new CSS rule for h3.post-title into your blog - because the latest one found is always the one used, and because the template designer's Add CSS function puts the rules you add after the othr rules.   I don't recommend it here, though, because working with the original rule makes it easier to see the effect of making changes to any of the values in the area.


Other affected spacing

If you have more than one post per page, then this change will also reduce the amount of space between the bottom of one post and the header of the next one.   Depending on your template, you want want to add a little more space into the margin statement in the bottom of the post-footer, eg
.post-footer {
  margin: 20px -2px 20;
  padding: 5px 10px;
}

If you display comments in your blog, you also need to check the impact on comments, because the original command applied to h4 items in comments as well.

If you are making a lot of changes, you may want to make a test blog, and plan your changes in private before applying them to your main blog.


Related Articles:


Setting up Google Analytics to get statistics about for your visitors

Adding a new CSS rule to your blog's template

Advantanges and disadvantages of editing your template.

How to edit your blogger template

Who did your blogger template come from - the quick way of finding out

Making a test-blog for template changes

Planning changes to your blog in private

Chitika overview

/ Saturday, August 20, 2011 /
This article is an introduction to the Chitika advertising programme, which is one of the alternatives considered by bloggers whose sites are not eligible to use Google AdSense.


Advertising MonitorChitika is another advertising programme - similar to Google AdSense, but run by a different company with slightly different rules and ways of publishing advertisements.

Ads shown by Chitika are not context-sensitive.  Instead, they are selected for your site using the search-terms a user entered to find the site.

Because they're not context-sensitive, you can display them on the same pages as AdSense ad-units.   At least the reason Chitika give - personally I've never been able to to find the AdSense condition that says "we must be the only context sensitive ads on a page", just one that says "no ads that look like ours".

Who sees Chitika ads:

Origianlly, Chitika ads weren't worldwide:  they were only displayed to readers from Canada and the US who got to your site by searching.   However this has been changed:  now they have two products:
  • Premium, shows ads related to the search query used by people who visit your site and come from one of Chitika's "accepted countries".   Currently (Aug 2011) there are 12 of them, including the USA, Canada, United Kingdom, Germany, Italy, Spain, the Netherlands, Denmark, Norway, Sweden and India.
  • Select, shows less-well-targetted ads to visitors from other countries, or who did not get to your site by searching for something.

If you want, you can opt-out of showing Select ads, so that visitors who don't get Premium ads don't actually see an ad at all.

You can see an example of Chitkia ads here:  this opens a new window showing you this page (the one you're reading now) as it would look to someone who arrives at the site by searching for "Blogger Hints".    


How to sign up for Chitika:

You sign up for Chitika in the usual way - they ask for a range of information about you and your website.   They do personally check each site, so it may take a few days or even weeks for account approval to come through .

It's a bit more "tecchie" to set up than AdSense - mainly because you need to install code from Chitika into your blog, instead of being able to just add a gadget in Blogger.    But (in 2010), I was able to log in for the first time, read the terms and conditions, mess around with some ad-formats, and place ads on my site in less than 2 hours this evening, with no glitches along the way.


Terms and Conditions:

This article is based on my understanding of the terms and conditions of Blogger, AdSense, and Chitika - as at today.   These companies may change their policies at any time, so before you implement anything, it is essential that you read the currrent T&C documents yourself, to sure that your site will comply.

Chitika has some quite stringent conditions.  For example, you can't use it on site promoting sale of alcohol, tobacco, haz-chem, weapons, and some other things.  This bit is quite near the end of their terms-and-conditions document - yet another reason to double-check before you start showing Chitika ads.


Related Articles:


Some other dvertising programmes

Setting up AdSense on your blog

Installing code from advertisers etc into your blog

More details about the Chitika programme.

Sign up for Chitika

Showing data in your blog

/ Saturday, August 13, 2011 /
This article is about how tables can be used to display data in Blogger, why you sometimes should use them, and how to make them.

Showing structured information in your blog


There are lots ways to make your blog reader-friendly:   bullet-pointed lists, pictures, grouping information into sections,  headings, etc

Bullet pointed lists are great if you only want to show one piece of data for each point.  

But if you want to show more data for each item, they're not so helpful.

Consider this example:
  • Monday: start time 5pm, Shona
  • Tuesday:  6pm, Jason
  • Wednesday:   rest day
  • Thursday:   5pm, Jason
  • Saturday & Sunday 3pm, Shona

Similar information isn't aligned - and if you want to tell readers that  the time shown is the start time and the name is the leader that day, you have to either put it in the text (which some readers will skim over and miss), or repeat it on every line.

To display data like this, a table is a far better option.  

So why do some people not recommend tables?  In the early days of web-browsers and HTML, tables were often used to control the layout of pages, and this lead to various problems.   This is why you'll find  people preaching vigorously against using tables, eg Sitepoint have an entire book (The Principles of Beautiful Web Design) on the topic.  

Nonetheless, tables do have a place - they are the best way to display truly tabular data.


Using Tables in Blogger

When I started using Blogger in 2009, there were issues with how the post-editor displayed tables - and people wrote articles like this about how to manipulate the HTML code so the tables displayed properly, without any extra line-break.  Thankfully, those problems have been fixed, and as far as I know Blogger's post-editor copes with HTML for tables.

However it doesn't have tools for creating tables  in Compose mode, so you need an alternative tool to make them.   Some options include:

1 Show the table as a picture:

Pipeline Data Hazard Make the table in a tool (eg Word, Excel) that does support table.   Turn this into an image file, eg by taking a screen shot, and show this picture in your blog.

This gives you a lot of control over how the table looks - but the contents in your table cannot be indexed by Google, so the won't show up in search-results.   It also won't work so well for longer tables.

2 Make the table in another tool and display the output

If you make a table in Word, then you may be able to display it in a blog-post by converting it via Google Docs.   (I know that this method works in general, but I haven't tested whether converted tables keep their formatting or not, so cannot confirm if it works).

Similarly, you could make it in a spreadsheet file (eg Excel),  upload it to Google Docs, and then use a  web-element to display it in your blog.   (I didn't much like these the last time I looked, because they put some "extra stuff" around the edge - not sure if they're still doing that or not.)

3 Edit the HTML-code behind your post

If you put the HTML code for a table into the post-editor's Edit HTML view, then blogger will draw the table correctly, even though the WYSIWYG Compose mode doesn't have functions to let you draw tables, or add/delete rows and columns. 

This method is more challenging than the others - but it gives you the most control over how the table looks.   .

To do it, you need to:
  1. Go into Edit HTML mode, 
  2. Find the place where you want the table to go
  3. Enter the code.   

Finding the place that you need t put the code can be challenging if you're not used to working with HTML - the article about Stopping pictures on your blog from being "clickable" has a hint about using marker-text to help with this.


Getting the HTML code to draw a table in your blog:

If you want to display tabular data on your blog or web-page, then you can either type the HTML instructions in manually, or use a tool that generates the code for you.

There are plenty of HTML table-generators around (google to find them):  you tell them how many rows and columns you want, and they generate the skeleton HTML code that you need for a table of those dimensions.  Then you simply have to copy-and-paste the code into the Edit HTML view of the post/page editor, and fill in the details you want to show inside the table.

This last step, filling in the details, is the hardest part.  The nicer table-generators help by putting some marker-text into each cell, so you can at least see where they are, for example, they provide code like
<table>
<tr>
<td> row 1, cell 1 </td>
<td> row 1, cell 2 </td>
<td> row 1, cell 3 </td>
</tr>
<tr>
<td> row 2, cell 1 </td>
<td> row 2, cell 2 </td>
<td> row 3, cell 3 </td>
</tr>
</table>

which looks like this in the post-editor screen:

Column 1 Column 2 Column3
row 1, cell 1 row 1, cell 2 row 1, cell 3
row 2, cell 1 row 2, cell 2 row 3, cell 3

And because the post-editor screen displays the table correctly, it is easy enough to edit the contents there.

(The code quoted doesn't actually show a table like that, which is centered with borders and a background colour.   I wanted to show the basic code here so you get the point - see the Appendix at the very end of the article for the actual code to produce a table like the one shown).

This works well for smallish tables.  But for larger tables (ones with lots of rows and/or columns), you may want to use a tool to create the HTML for you.  There are various options for this:

1 Output from Save-as a web page:

Products that work with tables (eg Word, Excel, PowerPoint) and can save files as HTML pages.    However the code that they produce will have a lot of extra things in it, including the formatting from the stylesheet in the original program.   Some of this code may not work well with Blogger - so I DO NOT recommend this approach.

2 Use a "proper" HTML editor:

If you have it, a tool like Dreamweaver (or similar web-site editors) is likely to create the HTML while giving you an easier front-end.   I've been told that Notepad++ is also useful for this, though I haven't figured it out yet.

3 Use Excel functions to "write" the HTML:

Many of the tables I make are genuine sets of data that I want to do other things with (eg sort, filter, cross-tabulate), as well as make Blogger posts about.   So it seemed sensible to find a way to use Excel's text-functions to create the "body" section of the HTML tables for Blogger - since HTML is really just text.).

This method has worked well for me, and has halved the time it takes to create posts on one of my blogs that shows a lot of Google custom maps.


A Final Thought:

This article is about putting tables into your blog-posts.   But the information applies equally well to putting them into gadgets - see putting HTML from outside sources into your blog for more details.


Related Articles:


Showing a picture in a blog-post

Using Excel text-functions to write the HTML for a table

Displaying the contents of  a Microsoft Word document in your blog

Writing posts for Blogger in MS Word

Putting HTML from outside sources into your blog

Stopping pictures from being "clickable"

Blogs, Blogger and blogger, Google and google - basic definitions for bloggers


Appendix: Code to make the example table:

This is the actual code used to make the table shown above.  It uses a mix of in-line CSS, and pure HTML formatting for the table features that CSS doesn't support:
<table border="1" cellpadding="5px" style="background-color: orange; border-collapse: collapse; margin: auto;">
<tbody>
<tr>
<th>Column 1</th>
<th>Column 2</th>
<th>Column3</th>
</tr>
<tr>
<td>row 1, cell 1 </td>
<td>row 1, cell 2 </td>
<td>row 1, cell 3 </td>
</tr>
<tr>
<td>row 2, cell 1 </td>
<td>row 2, cell 2 </td>
<td>row 3, cell 3 </td>
</tr>
</tbody></table>

Adding Amazon Associates product links and banners to your blog

/ Saturday, August 6, 2011 /
This article shows the options for putting product links, banners, widgets and page-links from Amazon into your blog-site.  


Overview:

HP booksThe integration between Blogger and Amazon.com means there are a number of ways to link your blog and Amazon - and the tools that Amazon provides means that there are a wide range of products you can show and functions your can provide to your readers.

You may do this just to make your blog look more interesting, or to make money by being an Amazon Associate and recommending their products to your readers.

There are four options for putting a link to Amazon inside your blog:
  1. Use one of the Amazon widgets found in Blogger's gadget menu.
  2. Use the Amazon Product Finder that is available when you're using the Post Editor in Blogger
    NB  This is only available if you've added previously - you can no longer add this to your blog, since Blogger / Amazon integration has ended.
  3. Log in to the appropriate Amazon site, find the product that  you want to link to, and choose "Link to this page", from the site-stripe at the top of the page.
  4. Log on to the appropriate Amazon site's Associates page, and use either the Links & Banner, or Widgets tabs.

Options 1 still works - but you have no way of linking the gadget to your Amazon Associates ID.  It lets you put:
  • Amazon gadgets into any place that you can put a regular Blogger gadget (header, footer, sidebar, etc),
  • Links to individual products from Amazon inside Posts or Pages.

Options 3 and 4:
  • Can be used with any Amazon site, no matter what you did with Amazon previously.   
  • Let you put the code into your blog in the same way that you install any 3rd party HTML into your blog.
  • Give you the full code for their widgets (ie gadgets), so you can put these gagdets into posts.    This is unlike gadget/widgets that you get from Blogger, which cannot be put into posts - at the moment anyway.
  • Can also be used if you want to put Amazon links inside other types of blog or website that allow you to install your own HTML/Javascript.

    Option 1 - adding an Amazon gadget in Blogger:

    • Go to
      Post-Sept 2011 Blogger (ie the new UI):  Layout > Add a Gadget. 
      Pre-Sept 2011 Blogger (ie the old UI):  Design > Page Elements > Add a Gadget. 
    • Choose one of the Amazon gadgets from the list.  (use the search item at the top of the list of gadgets to just get Amazon ones).  
    • When you have configured the gadget (eg entered a title), press Save.  
    • Then drag-and-drop the new gadget to where you want it to appear.

    I strongly recommend only selecting gadgets that say "By Amazon.com" underneath their description (because I just don't trust 3rd party gadgets).

    Also, be careful that the gadget(s) you choose don't conflict with any other tools that you have - for example, in you are using a Google Custom Search, one of the terms and conditions is that Google is the only search provider on your site, and this may mean that you should not use Amazon's search gadget.


    Option 2 - using the Amazon Product Finder:

    This option is no longer available, because Amazon / Blogger integration is over.


    Option 3:  Using Amazon's Link to this Page:

    This gives you a very quick way to get the HTML you need to put a product-link into your blog, which you can then put into your blog in the usual way.

    It's particularly useful because it lets you link not only to a product, but also to other pages, for example, and up to date list of Amazon sellers who are currently providing a particular product - Example of a link to used copes of HTML Dog's XHTML / CSS guide.

    See Amazon's article explaining the site stripe for more information about this.


    Option 4:  Using Amazon's own code builder

    If you go to the Affiliates page on the Amazon that you have signed up for, there are a number of ways (top menu, sidebar) to get into their code building tools.

    These tools are fairly intuitive to use:  choose the options you want, copy the code, and install it into your blog.


    Related Articles: 


    Amazon Integration is with Amazon.com

    Putting HTML from 3rd parties (like Amazon) into your blog

    Changing the Look of Amazon Associates advertisements

    Turning on the Amazon Associates Product Finder switches you to the new editor

    Google Custom Search Engines

    Series of articles about Amazon Associates and Blogger.

    Labels

    Thank you for visiting my site. I’m the author of home decor help, home garden decor, home design interiors, tina 4 home design, uhozz, visit yogurt lab, sitazine, is beauty tips and sunnijati website. Modestop Topmodest Free Beauty Tips Shitazine Sitahouseblog Izhealthy Shitadesign Sitahouse Topmodest Sitazine Irezine Home- decor-design Shitadesign Shitadesign-dot-com Inhomeland inhouseland ghiuldenika inebautystyle enterarteiuna radiodominiopublico biberealexandru fabiobernadosdi geeklore31 syahadah-alhafeezah peaceloveiman bigwideempty techandchefadventures kaosgunlugu fikirkulubleri duazinciri theinternationalrules morefortngintn monkeymanzach lifeatthegreenys photokid84 chelsea-settles chasingmommyhood sexyhotactresseswallpaper tophotnewstodays avvani urbantrendsussex voychic reisyamode sitazine reportmy homedesignideasx mystylepinterest fashionstyleco popularnewstips isexy-hot-girls sexywomengirl trendymodeku derumahdesign womenhairs hackoblogger gadiswomen homeinteriordesignideas1s homedesignideasa uniquehomedesignsw enterpreneurforbloggers earningblogtipss lilyandgiasmom onfeatureblog aboutadsen onblogsocial tecnologiku onlinekutip akuhub caramakemoney youseoneed blogukus newbieblogit adsenseguideto triond-adsense inseoservice intipseoblog otherseoblog freeseoguid seoblognets tawaguideblog seosecretip buzdesign modewomen gayawoman cantikide tipsehat bebeautyps tipsjilbabcantiks idekontenislami healthfitnessnutritionsz jilbab-tips tips-home-decor caramemakaijilbabv beritaremajaterkinie allisoncrewnews mypinspinterest mypinspinterest gogirlsgallery seyhotgirls topmodest worldotgirls seksigirlsblog yourgirlsnet sexywomensia decorativehousedesigns simplebloggertipsz aboutadsense09s marketingner freeseotipstricksz womensiana chicstylegallery oblogkudewe colhomegallery marketserve onlibusiness artodesign designinguide oninteriorhome interiormu intutorblog blogoffeed newbloggerhint enginseo dibisnistips internetmublog onroomdesign homegardenco
     
    Copyright © 2010 New Blogger Tips, All rights reserved
    Design by DZignine. Powered by Blogger