Get your posts right before you publish them to your RSS feed

/ Monday, December 27, 2010 /
This article is about the relationship between your RSS feed and the Publish button, and ways of using Blogger to reduce the chances of readers seeing something that you didn't want to publish yet.

Your RSS feed and the Publish button


I've previously described why RSS is important for bloggers who care about building an audience.

But it's also important to realise that:
  • Some of your RSS subscribers only see the first version of each post that you publish, not the most recently edited one.
  • Even if you delete a post from your blog shortly after publishing it, the published version is still in your RSS feed and will be seen by people who read it.
    (I've heard that some feed-aggregator / reader tools do delete items, however some eg Google Reader, don't.)

Personally, I took a long time to understand the consequences of this:  When I started blogging, I Published early-and-often while I was writing each post, so I could see what it "felt" like.   (The Preview button, because it shows you the "look" but not the latest content, and editing the content was important to me.)  This meant that subscribers saw very early, drafty versions of my posts, so many of them decided to unsubscribe pretty quickly.

Even after I understood, I still occasionally hit Publish by accident.   And my writing wasn't good, because I find it hard to proof-read properly in the post-editor.

So far I've found two ways of using Blogger that can address this problem.


Option 1: Turn the blog-feed off, except when you publish the final version

Posts are only sent out in your blog's feed if the feed is turned on.  So every time you want to work on a post:
  • Turn the feed off (Settings > Site Feed > Allow Blog Feeds = None)
  • Work on your post, Publishing it as you like
  • Save the Post as Draft (so it's status is back to draft again)
  • Turn the feed on (Settings > Site Feed > Allow Blog Feeds = anything except None)
Or you could keep Allow Blog Feeds = None, turn it on every time you publish a post for the first time, and turn it off again afterwards.

This is particularly good approach if you have a lot of email subscribers via Feedburner - because that tool is currently (Dec 2010) sending out an update every time a post is published or updated, instead of just for every "new" publication (ie one that changes the post-status from Draft to Published).

However it's very manual, and there's always a risk that you might forget to turn the feed on or off at the right moment.


Option 2: Prepare posts in a separate blog


This is my preferred approach, and now there are at least three different "blogs" for each blog I that run:
  • The blog  (what IT professionals call "production")
  • A documentation blog, where I keep my notes about how it's put together
  • A pre-publication blog, when I keep posts that are being worked on.
The blog itself is set to public (or restricted to a limited audience if that's appropriate).  The others are set to:
  • Private   (Settings > Permissions > Blog readers = Only Blog Authors) 
  • Not listed (Settings > Basic > Add your blog to our listings = No)
  • Not indexed (Settings > Basic > Let search engines find your blog = No)
  • Not listed on my Blogger Profile (Dashboard > Edit Blogger Profile > Select blogs to display)
At various times, if I'm preparing for template changes or adding new features, I may also have test-blogs.  These are always set to Private too.

When I'm preparing a post, I work on it in the "pre-production" blog, and can Publish it as many times as I like.  Then when it's complete, I simply copy the post from the pre-prod blog to the real one, and publish it once.  

A big benefit is that if I get an idea about a potential post, I can just go to the pre-publication blog and make a very quick note about it:  the writing and research quality doesn't matter, because I'm the only person who sees it.

The one thing I need to do is to always check and re-check the blog I'm about to post in, every time I hit "Publish":  the day after I first released this post was the first time in ages that I accidentally published a draft post to this blog (subscribers will have seen it come through the feel) .... very embarrassing indeed!  

Have you found other ways to avoid problems like this?  
I'd love to hear about what works for you.


Related Articles:


Copying a post from one blog to another.

Why RSS is important for bloggers who care about building an audience

Using Feedburner to manage email subscribers

Restricting who can see your blog

Understanding Google Accounts

Planning changes to your blog in private - using a test blog

Telling Google, and visually-impaired people, about the pictures in your blog

/ Tuesday, December 21, 2010 /
This article is about why and how to attach keywords and related text to the pictures in your blog posts.  This is helpful for both search engine optimisation (SEO), and for making your blog accessible to people who use screen-reader software.

Pictures and your blog

Blogger has a set of tools for putting pictures into your blog, including several options for putting images into posts or gadgets. 

In most cases, the other content in each post provides enough information for Google's indexing tools to know what the post is aobut.

But if your blog mainly has photos, your posts may not have enough key words to get properly indexed.  And even if the image-indexing tools do some auto recognition, a description of a picture written by a human being  will almost always be better.

Also, if your blog-viewers may include visually impaired people or others who use screen-reader software, you need to think about how well your content will work for them:  if you put key information inside images but not in the text, then they won't be able to get this information in any way.

These two good reasons for adding "alternate text" to your pictures - and there may be more.

What's even better is that Blogger now has a tool for to make it easy to fix this.


How to add captions and alt-text to your pictures


Add the picture to your Post.

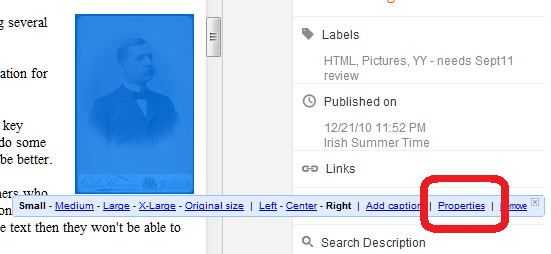
In Compose mode, float your most over the picture.   This will show the picture-editing-toolbar, like this:


Choose the Properties option.

This opens a dialog box where you can enter

  • A title - this is shown when a visitor hovers their mouse over the picture
  • Alt text - this is kept in the background, and only displayed to people who (for whatever reason) cannot see the picture.


What your readers will see


People who read your blog on line, either with a standard browser or an RSS feed reader, won't see anything different, until they hover over the photo.   When they hover, they will see the text you put into the Title field.


People who read your blog in their email (because you've offered a subscribe-by-email option) may see the alt text instead of the picture, depending on what setting they have in their email system.


People who use screen reader software will have the text that you added read out to them in the usual way that their software works.

And most importantly, search engines will see the text you added, and hopefully the will use it in indexing your post.


Other Alternatives:


Picasa and Picasa-web-albums captions can be included in slideshows (provided you don't use the Blogger gadget), but aren't included with individual pictures. 

And the Post and Pages editor also has an Add Caption option on the photo toolbar, although I only recommend using  if you're comfortable editing HTML, because it puts the picture into a table, and so to move it inside the post you need to edit the code, not just drag-and-drop it.


Related Articles:


Tools for putting pictures into your blog

Addingng a Picasa slideshow to your blog

Tools for applying copyright protection to your blog

Why RSS/Subscribe to Posts is important for your blog.

Adding a subscribe-by-email option to your blog

Encourage new subscribers by enabling Feedburner's FeedCount button

/ Sunday, December 5, 2010 /
This article is about how to add the FeedCount icon, which shows viewers how many subscribers your FeedBurner feed has, and lets them subscribe themselves.   The information is targeted at Blogger users, but most of it applies to anyone who uses Feedburner.

What is a FeedCount icon:


Previously I've explained how to create a Feedburner feed for your blog and how to add a Subscribe to my feed icon, and how to use Feedburner to provide an email subscription option.

Feedburner also provides another tool that you can use to let people sign up for your blog.  This is the FeedCount icon, which shows the number of people who are currently subscribed to your RSS feed.

This is useful because of the "social proof" that it provides:  people are more likely to sign up for something once they see that other people have also signed up.


How to add a FeedCount icon to you blog:


Log in to Feedburner, using the Google account that owns the feed.

Click on the name of the feed you want to provide a subscription tool for.

Choose the Publicize tab.

Choose the FeedCount option, from the left navigation bar.

Set the options for your button:
  • Static or animated (I recommend static, because things that flick unnecessarily are annoying)
  • Font colour for the background
  • Font color for the text

At the bottom of the screen, click the Activate button.

Either
OR
  • Choose Blogger from the drop down list beside "use as a widget in", and click Go

    This takes you to a Blogger screen where you can choose which blog you want to add the gadget to (if your current login has more than one), and what title to use for it. 

    When this is done, click Add Widget

    This takes you to the Design > Layout tab, where you can drag-and-drop the widget to wherever you want it.  

Note:  if you want to re-generate the button at a later time with different colour or style options, just choose the options and click Save (which is at the bottom of the screen where Activate was originally).


What your readers see:


Your readers will see an item, wherever you put it, that looks like this:


It shows a count of the current number of subscribers to your Feedburner feed.

When someone clicks on it, they are taken to a screen where they choose which feed-reader software they want to use to subscribe to your site.


Related Articles:


How to create a Feedburner feed for your blog

Using Feedburner to give your blog a Subscribe by Email option

Adding 3rd party HTML to your blog

Why RSS / Subscribe to Posts is important to your blog

Displaying a gadget only on the home page

FeedFlare lets you add social tools to your Feedburner feeds

Labels

Thank you for visiting my site. I’m the author of home decor help, home garden decor, home design interiors, tina 4 home design, uhozz, visit yogurt lab, sitazine, is beauty tips and sunnijati website. Modestop Topmodest Free Beauty Tips Shitazine Sitahouseblog Izhealthy Shitadesign Sitahouse Topmodest Sitazine Irezine Home- decor-design Shitadesign Shitadesign-dot-com Inhomeland inhouseland ghiuldenika inebautystyle enterarteiuna radiodominiopublico biberealexandru fabiobernadosdi geeklore31 syahadah-alhafeezah peaceloveiman bigwideempty techandchefadventures kaosgunlugu fikirkulubleri duazinciri theinternationalrules morefortngintn monkeymanzach lifeatthegreenys photokid84 chelsea-settles chasingmommyhood sexyhotactresseswallpaper tophotnewstodays avvani urbantrendsussex voychic reisyamode sitazine reportmy homedesignideasx mystylepinterest fashionstyleco popularnewstips isexy-hot-girls sexywomengirl trendymodeku derumahdesign womenhairs hackoblogger gadiswomen homeinteriordesignideas1s homedesignideasa uniquehomedesignsw enterpreneurforbloggers earningblogtipss lilyandgiasmom onfeatureblog aboutadsen onblogsocial tecnologiku onlinekutip akuhub caramakemoney youseoneed blogukus newbieblogit adsenseguideto triond-adsense inseoservice intipseoblog otherseoblog freeseoguid seoblognets tawaguideblog seosecretip buzdesign modewomen gayawoman cantikide tipsehat bebeautyps tipsjilbabcantiks idekontenislami healthfitnessnutritionsz jilbab-tips tips-home-decor caramemakaijilbabv beritaremajaterkinie allisoncrewnews mypinspinterest mypinspinterest gogirlsgallery seyhotgirls topmodest worldotgirls seksigirlsblog yourgirlsnet sexywomensia decorativehousedesigns simplebloggertipsz aboutadsense09s marketingner freeseotipstricksz womensiana chicstylegallery oblogkudewe colhomegallery marketserve onlibusiness artodesign designinguide oninteriorhome interiormu intutorblog blogoffeed newbloggerhint enginseo dibisnistips internetmublog onroomdesign homegardenco
 
Copyright © 2010 New Blogger Tips, All rights reserved
Design by DZignine. Powered by Blogger