Linking your Blog to the Social Networks

/ Monday, May 30, 2011 /
This article is about the difference between blogs and social networking sites, and the ways you can link your blog to the various sites.

Blogs vs Social Networks


The words "Social-network" or "social media site" usually to refer to Google+ Facebook, Twitter, LinkedIn, Bebo, MySpace,  etc.   But they can include any site that you think of as part of your own network of people.   Some people even include Flickr and YouTube in the list, though personally I still see them as about file sharing rather than "friendship", even though you can define groups of people that you share the files with.

Your blog is also part of your on-line social network.   But it's different from the other social-media sites:

1)  It makes sense for one person to have more than one blog - it doesn't make sense to have multiple personal Facebook accounts (there's only one you) , and

2)  A blog is mainly about showing people your writing (or photography etc) in longer amounts (posts), with a small amount of profile information.   The other social-media-sites are mainly about having a larger profile, and putting small bits of writing (status updates) with that.

3)  In your blog, history is kept - history matters.   In the social-media-sites, NOW is what matters most.   We don't really know how long the various social websites will keep history on-line for, but can you imagine caring about what someone tweet-ed ten years ago, unless you're a historical researcher?


Ways of linking your Blog and the Social Networks


There are many, many different options for linking your blog and regular websites.

Social media offer a more limited range of options, because you generally can only change the content, not the structure, of your site there.   But it can be difficult to understand the different types of links, because people are quite loose in the way they're described.

At the moment, I'm seeing four main approaches to linking your blog with the "social networks":

"Follow-me"

Asking your blog-readers to link to their own social-media-site account to your (or your blog's) account on the social-site


"Look at this"

Giving your readers a tool that they can use to update their own social-media site (usually their status) with a reference to the page on your blog that they've just read.   This may involve sharing, or just noting their approval ("liking") your site.


"Look-what-I-wrote"

Automatically updating your social-network-site with content that you posted on your blog.

This has a variation, "look what she wrote" - setting up your social-network site to automatically show what some other interesting person said.


"Look-what-I-said-over-there"   

 Automatically updating your blog with content that you posted on your social networking site.


Making the links

Having identified these ways of linking your blog and Facebook, Twitter, etc, the next step is to actually make the links.  The social networks do these things in different ways, and not every type of link is available in each network, yet.   See Tools for linking your Blog and the Social Media for more specific information.


Working out what to post where

Sometimes, you might want to make the links so that people can follow you where they want to - but still use different tools primarily for different audiences, based on who actually uses each network.   This template can help you work out what you want to use each network for.


Related Articles


Options for linking your blog and regular websites.

Taking action when someone has copied your blog without your permission

Why RSS / Subscribe to Posts is important for bloggers

Adding social networking tools tools to your blogs' RSS feed.

Tools for linking your Blog and the Social Sharing Sites

Putting a picture on your blog as a Gadget

/ /
You can put a picture anywhere in your Blogger blog that you can insert a gadget - and you can make it link to a post in your blog or to any other website.

The Picture gadget

Dry dock in Claddagh Basin
A very simple way to put a picture into your blog is to use a Picture gadget.   This is a tool that Blogger provides to make is easy to add a picture that shows up an all pages and is linked to somewhere.

Often gadgets (sometimes called widgets or page elements) are put on the sidebar - but in many blogger templates they can go almost anywhere.


Follow these steps to add a picture gadget:

1  Make sure you know where the original picture is and that you have copyright permission to use it.

2  Copy the location (URL or file system full path-name) of the picture - and remember whether it's on your computer, or on the internet.  
(This article tells you how to find the URL of a picture that's already stored in Picasa.   To find the URL of a picture on the internet, you can often right-click on it and choose "copy image location")

3  In Blogger, follow the usual Add a Gadget procedure, and choose the Picture gadget from the list of options.

4  In the Configure-Image box, enter the options you want for your picture.   These include:

  • The title for the Gadget,
  • The caption for the picture
    (the small words that go underneath it, usually explaining it, or where it came from),
  • What should happen when a reader clicks the picture - put this into the Link field
  • Where to find the picture
    (ie the file-location that you copied in step 2)
  • Whether to re-size (ie shrink) the picture to fix the space in the sidebar in your current template.

5 Press Save.

6  If necessary, drag-and-drop the new gadget to the place where you want the picture to go, and press Save.

  
What your visitors see:

People who visit your blog in a web-browser, will see the picture, in the place where you put the gadget.  However pictures are not supported gadgets for dynamic view templates, so it won't be see if you use one of these.

Also, people who see your blog through an RSS reader, or by receiving emailed updates don't see any gadgets, so they will not see the picture.  

If you entered a value for Link, your visitor's browser leaves your blog and goes to the Link location:  with the Picture gadget, then there is no way to make this open a new window.   If you want to do so, then use an HTML gadget instead, get the code for the picture, and put target = "_blank"   into it:, so the code looks something like: 
<a href="YOUR LINK" imageanchor="1" style="margin-left: 1em; margin-right: 1em;" target = "_blank"><img border="0" src="YOUR PICTURE LOCATION" /></a>


Related Articles:


Options for putting pictures into your blog

Copyright, blogs and bloggers

Picasa and Blogger - an overview

Getting the HTML to add a picture to your blog

Finding a picture's location in Pisasa-web-albums

Finding the URL of a picture stored in Flickr

Showing a PowerPoint presentation in your blog

Why RSS / Subscribe to Posts is important for bloggers

Following a blog by email

Feedflare lets you add social tools to your RSS feed

/ Thursday, May 26, 2011 /
This article is about using Feedburner's tools for adding interactive features and social networking links to your RSS feed items.


What is FeedFlare useful for?

Many bloggers spend a lot of time making social sharing features available on-screen in their blog - using things like Facebook's share button, follow-me on Twitter, etc.

But all this effort is lost on people who view your blog via an RSS feedreader.  All they see is the content that's sent through your feed:  they don't see any gadgets at all, unless they click-through to look at your blog.

If your feed is being managed with Feedburner, then the FeedFlare tools let you add social networking and interactive links to each post that you send out in your feed.   Unlike your blog, you can't control where they're put or how they look.  But many people believe that having them in a limited form is a lot better than not having them at all.

Currently the tools that can be added using FeedFlare include
  • Email the author
  • Post to Facebook
  • Post to Digg This
  • Save to del.ic.ious
  • Discuss on Newsvine
  • Stumble! it
  • Add to Mixx!
Note that Twitter isn't currently included.


Turning on the FeedFlare for your feed:

Log in to Feedburner, using the Google account that owns the feed


Click on the name of the feed you want to work with.

Choose the Optimize tab

Click on FeedFlare in the left hand navigation bar.

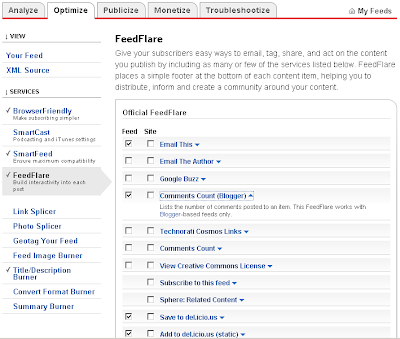
This opens a list of the options that can currently be turned on using the FeedFlare function - as show in the picture below.
Note:  this list has expanded during recent months, it's worth checking back occasionally to see if something you would find useful has been added.


Tick the items that you want to use in the column headed "Feed".   Each thing that you tick will show up at the bottom of each feed item when it's viewed in an RSS reader.
Many (or even all) item-names can be clicked on to show a more detailed explanation of what the item is about.  eg clicking on "Comments Count (Blogger" reveals the explanation "Lists the number of comments posted to an item. This FeedFlare works with Blogger-based feeds only."

The Personal Feed Flare section lets you add more Flare items, either by choosing from Feedburner's catalogue or by building your own using Feedburner's API.
I'm not doing to discuss these options here, except to note that
  • Potentially this tool can be used to add your custom items (eg an eBook that you have written) to your feed, so they're available to subscribers.  (I may devote a future article to this)
  • Many of the items in Feedburner's catalog but not on their main list were developed by 3rd party developers - as with other widgets and templates, I'm very reluctant to recommend using them, because of the lack of assurance that they do exactly - and only - what they claim to.

When you are happy with the options selected, click Activate to start the service - or click Save if you have adjusted the flare options.

You will know that the change has been made because the word Feedflare (in the left navigation bar) has a small tick beside it.   Check for this - it's very easy to miss the Activate button because it's at the bottom of the screen and you have to scroll to get to it.

Job Done!


Note:  There is also a column headed Site.   This lets you generate code to put the items ticked into your website, and t he "on Site" section at the bottom of the screen gives you  the HTML code to put FeedFlare for the ticked items onto your site, and has (slightly out-of-date) instructions for how to install the code into Blogger.    I'm not recommending this, because there are now plenty of articles about how to put better-looking and more functional items into your blog.


What your readers see:

How your reader see posts when they view them with a feed reader depends on their own browser settings (as always), and also on specific the feed reader software they're using (Google Reader, Bloglines, etc).

The picture below shows the bottom of my Blogger-Hints-and-Tips feed, when viewed in Google reader.   The items selected in FeedFlare are shown as bullet-ed items.  Underneath that, Google Reader also has some other links too.


Related Articles: 


Making a Feedburner feed for your blog

Putting a subscribe to me feed option on to your blog

Tools for linking Blogger and the Social Networking sites

Adding a Tweet button to your blog

Linking your blog and the social networks

Putting a badge for a Facebook page into your blog

Putting email-links into your blog

/ Monday, May 23, 2011 /
This article is about how to show an email address in your Blogger blog.

Overivew

Previously, I've described the email address that is shown in the navbar when someone is reading your blog.

But there may be cases when you do want to display your own, or perhaps your company or club,  email address on your blog.    Lots of people warn against doing this because you could get lots of dodgy spam, but so far I haven't had problems on several blogs where I've done it (or maybe my ISP just has a good spam filter).

How you put an email address into your blog depends on where you want to put it, and whether you just want to display the actual address, or to display some other linked text that is set up so that when a reader clicks it, they are taken to their email system to send you a message.


Putting a linked email address into a Post or Page:

Edit the Post or Page in the usual way:
  • In the place where you want the address to go, type it - eg  fred@frog.org.cc
  • Select the address, and click the Link button on the toolbar

Most probably, Blogger will recognise that you've put in an email address, and automatically make the link as soon as your click the button.   eg   fred@frog.org.cc

If the link isn't automatically made, then the link dialog box opens.  In it, select the "Email address" radio button.
  • Type the words you want your reader to see into the Display field.  
  • Put the email address that you want messages sent to into the Link to field.
  • Press Ok.

Later on, if you want to change the email address (eg if it was automatically made, and you want to change the words that are shown), just hover your mouse over the address, and choose "change" from the blue hover menu.


Putting a linked email address into a Text or HTML Gadget :


Putting an email address into a text or HTML-Javascript gadget is similar to putting it into a post, with one important change:
  • Type the words that you want your reader to see
  • Select them and click the Link button.
  • In the dialog box that comes up, delete "http://" that is there initially.
  • Type in     mailto://THE-EMAIL-YOU-WANT-TO-USE and press OK


The HTML in the gadget now says
 <a href="mailto:YOUR-EMAIL-ADDRESS"> THE TEXT YOU WANT TO DISPLAY</a> 
(though you may not see this if you're looking at a text gadget).


Using an email address with a picture Gadget:


It's easy to have a picture on your blog, set up so that when a reader clicks on the picture they can send you an email.  :
  • In the Link field, type  mailto://THE-EMAIL-YOU-WANT-TO-USE


Once you save the gadget, the picture will be click-able, and when a reader clicks on it they will be invited to send an email message.


What your readers will see:

If you have put an email address into your blog in this way, your readers will see it as a link (or a picture, if you used this option).  It may be look like an email address, or it may look like something else if you have used display text.    For example, this phrase is linked to emailing fred@frog.org.cc

When your reader clicks on the link, they are taken to whatever system is set up on their computer / internet-browser for sending a new email message, and the the email address that you used is in the To box.

For example, my own computer is set up to use Microsoft Outlook, so if I click on a mail-to link, a new Outlook message opens, with the address filled in and my default signature included.


Related Articles: 


Understanding the email address that is shown in your blog

The Follow-by-email gadget - an easy way to add Feedburner to your blog

Putting HTML from a 3rd party into your blog

Setting up your custom domain (including your admin email address)

Tools for applying copyright protection to your blog

Putting a slideshow from Picasa into your blog

/ Saturday, May 21, 2011 /
This article is about how to put a Picasa slideshow into your blog, using Picasa's slideshow tool.   

It also looks at the security issues that may be involved in doing this, and suggests some ways around these.

Picasa, Albums and Slideshows:

Previously I've explained what Picasa is and how it is used by Blogger as the default place to store uploaded pictures.

You can also use Picasa in more complicated ways.  You can put a set of pictures in a separate "album" (Picasa's word for a user-defined group of photos), and it will give you the HTML code to use to show these photos in your blog (or any other website).  


There are two ways of doing this:
  • Link to the album:  clicking on the link takes your visitor away from your website and into Picasa-web-albums, where they can use the PWA tools to look through the pictures
  • Link to a slideshow:   this scrolls through the photos that are in the album at the time, right inside your website.  Here's an example of a slideshow:


This article is a step-by-step guide to the second option, is showing a Picasa-web-album in your Blogger as a slideshow.    A similar approach will work for other websites, thought the details will vary slightly.


How to insert your slideshow:

Go to Picasa Web Albums (http://picasaweb.google.com/home), and log in with the Google account that owns (or you want to own) the album.
  1. Check that you have already uploaded the album you want from your PC to Picasa-web-albums.
    (and if you haven't, go back to Picasa and upload it now)
  2. Choose an album by clicking on it.
    The album view opens, showing you a thumbnail of all the photos in it on the left of the screen. On the right of the screen, there is a sidebar of useful tools.
  3. Under the Edit drop-down (the one in the album, not the edit menu in the browser), check that Visibility is set to either "Anyone with the Link" or "Public on the web"
  4. Click on "Link to this Album"  (currently it's in a small font, 3/4 of the way down the right-hand sidebar - this may change if Picasa changes its interface)
  5. Click on "Embed Slideshow"  (currently this shows up underneath "Link ... " - and only AFTER you've clicked link...)
    This opens a new dialog box, over the top of your current browser window.


  6. Fill in the details you want
    (slideshow size, whether or not to show captions and to autoplay the slides, etc)
  7. Copy the HTML from the box at the bottom of the left hand-side (the one labelled "Copy and paste ..."
  8. Go to Blogger and log in with a Google account that has rights to edit the the blog - note that this doesn't need to be the same account that owns the Picasa album.
  9. You can put the code that you copied into your blog in the same way you would adding any other 3rd party HTML to it.

What you see in the Post Editor:

If you put the slideshow into a blog-post, the the way that the post-editor currently works with code means that the slideshow is not visible while you are editing the post.   This means it's easy to accidentally over-write or delete the code.

One way around this is to put some "marker text" before and after it.

For example, I've put in <hr /> and <blockquote> </blockqoute> statements before and after the code just underneath this paragraph.   While I'm in the editor, all I can see is a pair of parallel lines, with nothing between them.   But (because you're visiting the blog after it's published) you can see a slideshow in between.


This makes the code look like:

<blockquote>
<hr />
<embed flashvars="host=picasaweb.google.com&amp;hl=en_US&amp;feat=flashalbum&amp;RGB=0x000000&amp;feed=https%3A%2F%2Fpicasaweb.google.com%2Fdata%2Ffeed%2Fapi%2Fuser%2F105223767362417288786%2Falbumid%2F5439615839989953921%3Falt%3Drss%26kind%3Dphoto%26authkey%3DGv1sRgCK7yg5XUpNHZtAE%26hl%3Den_US" height="192" pluginspage="http://www.macromedia.com/go/getflashplayer" src="https://picasaweb.google.com/s/c/bin/slideshow.swf" type="application/x-shockwave-flash" width="288"></embed>
<br />
<hr />
</blockquote>


What your visitors see - and can access:

The steps above puts a slideshow of the photos in the album at the current time into your blog post.

You can use the examples above to get an idea of how these slideshows work:  they have next, play / pause, and previous buttons, and you can toggle captions on/off.   The top example has auto-play ON, while the second one has it OFF.

On important thing to note:   when your visitors click on the slideshow itself (anywhere but on previous / play / next buttons), they are taken to the place in Picasa-web-albums where the album is.

From here, they can get to ANY other albums owned by the same Google account that are either Public or Visible to Anyone With the Link.

This may or may not be a problem for you - but it's something that you should be aware of.  It certainly was a problem for me initially, and I had to go and get a slideshow in a Google account with no personal pictures to make the examples in this post.   

If you are not willing to live with this level of security, then I suspect (am yet to confirm) that using the RSS feed provided by Picasa with Blogger's own slideshow gadget may be a better approach.   This will only work in places where you can put a gadget - although it may be possible to use a 3rd party service that converts a feed into Javascript to make code that can be put inside a post.    Or totally different solution is to put your pictures into a PowerPoint slideshow and display it in your blog.


Related Articles: 


Picasa & Blogger - Part 1, What is Picasa?

Picasa & Blogger - Part 2, Options for linking Picasa into your Blog

Showing a PowerPoint presentation as a slideshow in your blog

Putting 3rd party HTML into your blog

Using Labels to categorize your Blogger Posts

/ Friday, May 20, 2011 /
This article explains how to use Labels to categorise the Posts in your Blog, and how you can get around some of the limitations in Bloggers categorising tools.

Why to categorise your Posts

watermelon salad recipe can be labelled / tagged as  fruit, salad, dessert and pink
Grouping your blog's contents makes it easier for people who have reached your blog via Search to find other posts that they may be interested in - provided you add tools to your blog that let them navigate using labels.

It's essential if you want to make it look like you have put your Posts into Pages.

And it helps you to find posts yourself.


Blogger's tools for working with categories

The only tool that Blogger provides for categorising or grouping Posts is Labels.

In short, Labels are tags that you apply to posts.

Each post can have as many Labels as you want (there is an upper limit of 5000 labels-per-blog, but most people don't get near it).

And you can use labels for different purposes.  For example, a post titled "Photographing Long-haired Black Cats" could have three different labels
  • Cats - the the animal it's about
  • Photography - for the functional category
  • Jane Smith - for the author
The Labels gadget lets readers choose which groups of posts to see:  when a visitor clicks an item on the labels gadget, they are shown a list of posts that have the selected label applied to them.

You can add the Labels gadget as many times as you like, selecting which specific label values to show each time.   In the example above, you might add it three times, once for ainmals (showing Cats, Dogs and Rabbits), once for function (showing feeding, grooming and photography), and once for author (showing Jane Smith and Joe Bloggs).


How to add Labels to your blog:

1  Label your Posts:

For each post, add one or more labels.  You can add labels

Using the pre-Sept-2011 / old blogger interface:
  • In the post-editor, at the bottom right of the editor screen, or 
  • From the Edit Posts tab, by ticking the posts you want to put the labels on, and then choose the label or "New label ...") from the Label Actions drop-down box at the top of the screen.

Using the post-Sept-2011 / new blogger interface:
  • In the post-editor, in the Labels section at the right side of the post-editor or 
  • From the Posts tab, tick the posts you want to put the labels on, and then use the drop down arrow from the top icon that looks like a small luggage-tag:   choose the label or "New label ...").

2 Add the labels gadget:

Add the Labels gadget to your blog - the same way you would add any other gadget .   You can add it as many times as you need, choosing which labels to show each time.
 
Warning:  If you choose to show only a certain selection of Labels in a gadget, then this is all that it will show even if you add new labels to your posts later on.  However if you don't restrict which labels are shown, then new ones are automatically shown in the gadget if they are associated with published posts.

Drag-and-drop the labels gadget to wherever you want it:  some people put it just underneath their header, to make readers think they've looking at a more traditional web-page.

3 Add Labels navigation

Another way for your readers access labels is from the display in the post header or footer of the list of labels assigned to each post.

This is turned on by default in most templates:  you can change the setting and move it around using post-templete settings found under:

Using the pre-Sept-2011 / old blogger interface:   Design > Page Elements > Blog Posts (edit).
Using the post-Sept-2011 / new blogger interface:  Layout  > Blog Posts (edit)


What your visitors see:


A List of Posts:

If a visitor to your blog clicks on an item in the labels gadget or in the labels-list that is show for apost, then the "labels-view screen" is used to show them the posts that have the selected label.

This screen is like the main screen: is only shows a certain number of posts and visitors need to use the newer-posts and older-posts links to move back through the list.

Like the main screen, if you have used jump-breaks in your posts, then the list only shows the first part of each post.  If you haven't used jump-breaks, then the whole posts are shown.


A summary message:

Unlike the main screen, in most templates there is a message at the top of the page saying:
"Showing newest posts with label WHAT-EVER-YOU-CHOSE. Show older posts"

Or if there are no published posts with the selected Label, the message is slightly different.  Some people change their template to customise or remove this message:  Chuck in The Real Blogger Status has written an excellent description of  how to do this.


What Labels aren't - but appear to be:

Many people think that Labels are a way of actually putting Posts into pages.  However the Posts aren't actually moved around.  The labels-screen is just a way of viewing a smaller-than-usual group of Posts, and can make it look like you have put your posts into sub-pages.


Making multi-level categories:

Currently, Blogger only supports one level of grouping.  The only way you can make sub-groups of Labels is to add two categories to each post - one for the "major" category, and one for the "minor" category

For example you might use labels like these
Major category:  Minor categories:
Recipes: Sweet, Savory, Wheat-free
Party-games: ice-breaker, run-around, silent, outdoor
Music: lively, soft & gentle, traditional, instrumental
Each post would need to have at least one label from the major category, and one from the minor categories.

If you do this, you need to be clever about adding two levels of gadget, with only a selected group of labels shown in each gadget.   You might even need to edit your template, to only show certain gadgets in certain situations.


Related Articles:


Posts, Pages and Navigation

Setting what goes on the Home Page

Editing your blog's template:  advantages and disadvantages

Making it look like you have put your posts into pages.

Using a Google-search-engine to add a custom search gadget to your blog

/ Thursday, May 19, 2011 /
This article is about adding a Google Custom Search Engine (CSE) to a blog made with Blogger.  However much of the information is relevant to putting Google-CSE's into other blogs and websites also.

Search vs Custom Search

Four stroke cycle compression
Blogger provides a search gadget that you can add to your blog the same way you add any other gadget.   This works well, provided your blog is public, and you have allowed Google to index it:
Old interface:  Settings > Basic > Let search engines find your blog = Yes.
New interface:  Settings > Basic > Privacy - edit > Let search engines find your blog = Yes

However if you want more control over how the search in your blog works or if you are an AdSense publisher and want to (potentially) earn revenue from ads on the results page then you need to use a Custom Search Engine.  (Or some other non-Google search engine might work too - but it's not what I'm covering in this article.)

A Custom Search Engine (CSE) is like a specialised widget:  you log into the CSE-editor and set up the search options, and then are given some code to put into your blog.   Setting up the options and putting the code into your blog isn't hard, but you do need to do a few specific steps to make sure the code you are given that works inside Blogger.

If you use a CSE, as well as getting a share of the AdSense earnings, you can also customize the search, eg by searching more than just the one site, turning auto-suggestion on, modifying searches with additional keyworks, adding refinements, changing the layout of results, etc.


Creating your Custom Search Engine

Follow these steps to make your own search tool, and install it into your blog.

Log in:

1  Go to Google's custom-search-engine application

2  Log in with the Google account that owns the blog

You can transfer a blog from one Google account to another one.   But there is not currently any way to transfer ownership of a CSE between Google accounts.   So if there is any chance that you might want to hand the blog over to someone else in the future, it's a good idea to make sure that items like this are owned by a Google account that can go with it.

3  Click the Create a Custom Search Engine button (currently a very large button near the top right of the screen)


Start your CSE:

4  A simple wizard opens, to help you create the CSE.  Fill in these fields on the first screen:
  • Name - what you will know it as
  • Description - describe what it's about (mostly so you know later on, I think)
  • Language - if your blog isn't in English, it's important to change this to the correct language, so that the search works correctly.
  • Sites to search:

    Enter your blog's URL.  

    Put  www. at the beginning, and  /* at the end (this says to search all of your blog, not just the home page) . 

    Example, the sites-list for the search on this blog is www.blogger-hints-and-tips.blogspot.com/*
  • Edition - unless you are willing to pay $US100/year, you need to select Standard edition. 

    This displays Ads-by-Google on the search results page.  But if you are an AdSense publisher you can link these ads to your account and earn revenue if they are clicked on.
5  Read the Terms of Service, and if you are happy with them tick the box and press Next.   One important rule (when this post was first written) is that Google needs to be the only search-provider on your site.   I don't know how strict they are about this - and I'm not about to put an Amazon search widget onto one of my blogs to find out.

6  Choose a Style

Test the search:
  • Enter a search-term
  • Click the Search button
  • On the screen, check that the search looks and works ok.   If not, search for words from a post entered several weeks ago, in case Google is behind in indexing your blog.
  • If necessary, go back and make changes.

You can choose different themes for the search results without re-running the test-search:  just click a theme and wait a second or two for the screen to re-draw. 

8  Create the CSE by clicking Next


At this point, the CSE-editor makes you think that you can use the HTML that is shown.  However there is more customising that you can do - and more that you must do if your CSE is going into a site created with Blogger.


Customize your CSE:

9  Click any of the options in the list to go to the CSE Control Panel for your Google account.   In this Control Panel:
  • The Basics and Sites tabs have a little more information than was in the set-up wizard, but you do not need to change them
  • Refinements and Promotions let you add extra functions to your search.  They are not needed for a standard blog-search.  Refer to Google's documentation (available from the tabs) for more about them.
  • Synonyms lets you upload a customised set of word-combinations that should be treated as equivalent in your search. 

    For example, in Blogger-hints-and-tips if I always use the word "gadget" in posts, it would be sensible for me to upload "widgets" and "page elements" as synonyms since they mean the same thing, and are terms that people are likely to search for.  However even though it would be sensible, I haven't actually uploaded this list, and the custom-search here seems to work well enough.
  • Autocomplete offers searches similar to the one your reader (appears to be) typing:  by default it's turned off, but if people who search your site a used to standard Google search (which now has it on) then it may be good to turn it on

    You also have an option to manually include or exclude certain auto-complete patterns  could be useful if your blog is in a niche with very specific terms for which the standard auto-complete option is totally wrong.
  • Look and feel:  this is is essential for custom-searches that are to be used in Blogger.

    Firstly, you need to choose a layout:   I've described the options for CSE screen layout for people who needed to convert existing CSEs to the most recent layout options, but the notes there will help you see what layout might be right for your blog.

    Second, under Choose or Customize a Style, you may choose a style:  by default it's set to the value you picked in the wizard.  There is also a Customize button, and this let you edit a number of features including the colours, how the Google brand is shown, and whether or not a logo is shown at the top of the search results.
  • Make Money:

    If you don't already have an AdSense account, you can apply for one from here.   Because you will be using AdSense for Search, rather than AdSense for content, the rules and processes are a little different to those for joining AdSense for your blog.

    If you have an AdSense account on the Google account that's making the CSE, then this connection is easy - just turn it on. 

    If your AdSense account is associated with another Google account, then you need to make the connection by entering the Google Account ID and certain other information that you've previously associated with the account, like phone number and postal code.:


Install:

10  Once all the customization is done, choose the Get Code tab.  Copy the HTML that is shown, and install it into your blog - either into an HTML gadget, or into a Post or Page.


Related Articles: 


Putting HTML from a 3rd party into your blog

Transferring a blog from one Google account to another

Setting up AdSense on your Blog

Showing image-only AdSense ads in your Blog

Finding a picture's URL in Picasa-web-albums.

Hosting pictures outside of Google/Picasa

/ /
This article is about how to use pictures stored outside of Picasa-web-albums in your blog. It also looks at the risks and issues you might face if you do this


Where does Blogger usually store pictures

When you put a picture into a blog post, it is usually stored in Picasa-web-albums, the on-line part of Google's photo management tools.

For example, the picture at the start of this article was uploaded from my desktop, and so is stored in a folder in the Picasa-web-albums associated with my Google account.

I can see it here in the album:


Alternatives to Picasa-web-albums:

There are many other on-line photo storage and sharing options, eg Photobucket, flickr - and you can even use Google Docs which can now store files of all types.

For example, this photo (creative commons licensed, with no known copyright restrictions) is stored in flickr

To insert it into the post, I:

  • Used the standard Picture icon on Post Editor toolbar in Blogger, and chose the "from URL" option, and pasted in the URL


But because the photo is hosted elsewhere (in this case in flickR), it is not put into Picasa-web-albums.

Instead the code for it points to the location in flickR where it's found:
<div class="separator" style="clear: both; text-align: center;">
<a href="http://farm4.static.flickr.com/3309/3291223203_acbcce9483_m.jpg" imageanchor="1" style="clear: right; float: right; margin-bottom: 1em; margin-left: 1em;"><img border="0" src="http://farm4.static.flickr.com/3309/3291223203_acbcce9483_m.jpg" /></a></div>
Hosting photographs elsewhere is one way to work around the size restrictions which Google has placed on Picasa-web-albums accounts.   (Another is to link you blog to your Google + account).

You do need to make sure that the security options for the account and/or album that they're placed are set up so that at least anyone with the link is able to read the files.

Be aware that a photo that is stored outside of Picasa-web-albums cannot be used as the thumbnail for your post:   if all the illustrations in a post are stored elsewhere, then the post simply will not have a thumbnail.


Risks and Issues:

Disappearing Photos:
When you don't control the files that pictures are in, there is a risk that the pictures might "disappear" if whoever is hosting them (flickR in the above example) decides to move them or even just change the structure of their URLs.

There is, of course, the same risk with PWA, but since you need to be signed in to put a file into Picasa, Google knows that it's yours and can email you and let you know about upcoming changes.  flickR, on the other hand, has no record my setting up an URL to the photo, so cannot give me any warning.

Integration:
Picasa/Google have various tools for showing slideshows in blogs.  The specific features that any photo-sharing tool has change from time to time, but by using the tools from Google there is more chance that the will definitely work well with other Google tools, like Blogger.


Related Articles: 


Applying copyright protection to your blog

Putting HTML from a 3rd party into your blog

Putting a slideshow into a Blogger post

Picasa - a basic introduction

Understanding post.thumbnail, the picture used to summarise a post

Creating a button that links to your blog.

What is Picasa - a very basic introduction

/ Saturday, May 14, 2011 /
Picasa is Google's tool for managing image files.   This basic explanation of how it works is especially useful for new Blogger users who need to understand where pictures that they load to their blog are kept.
 

What is Picasa


Abb 2 beugungsbilder komplementaerer blenden
Picasa is Google's tool for that individual people can use to manage and share image files (especially photographs) that they own or have the right to make copies of.


Picasa has three parts:
  • An application program ("Picasa") that you download, install and run on your PC.  It works with the files store on your computer.
  • Picasa-web-albums (PWA):  a place on the internet where you can store and share photos
  • Another application program (Picasa-web) that lets you manage photos stores in Picasa-web-albums.   This software (like Blogger) runs totally inside your web-browser, and you don't ever have to download or install it.
The Picasa application program has an Upload button which lets you transfer copies of pictures from your PC to your Picasa-web-albums.

Your Picasa-web-albums are owned by your Google account - the same Google account that you use for Blogger, and various other Google tools.   


Why Use Picasa-web-alblums:
    It's how Blogger works
    When you write a post in Blogger, it looks like you can upload pictures - and before 2006, this was how things worked.

    But when Google took over Blogger, they saw that it was silly for them to have two different places for storing pictures.   So they set things up so that pictures uploaded in Blogger are stored in a Picasa-web-album.

    And they added some features in Blogger so that as well as uploading pictures from your PC, can you also just choose ones that are already in Picasa-web-albums, and use them in your blog without making a second copy.

    Photo sharing
    Even people who aren't writing blogs want to share photographs with their friends.   Doing this by email gets cumbersome if you have a lot of photos, and can use a lot of space.  A better alternative is to put the photographs in a place on the internet, set up the security so that you control who can see them, and then tell your friends where to find them.

    Many on-line services for doing this have been developed - Picasa is Google's version.  (Google Inc, the company, not google search.)


    On-line backup:
    Keeping a copy of your photos on-line is one way to ensure you have access to them even if something goes wrong with your PC (eg it crashes or is stolen).    Picasa is an option for this, but you should be aware that the copy stored in Picasa-web-albums may not have as much file-size as the original picture if it was uploaded through Blogger.

    Personally, I always upload pictures through PWA, and then use links to them from Blogger, so that I can resolution of the pictures that are in my albums.


    Next:  

    How Picasa Manages Pictures: Understanding Picasa, Picasa-web-albums and Blogger in-depth


    Related Articles


    Understanding Google accounts

    Blogs, Blogger and Bloggers; Google Inc and google search, etc - some basic phrases

    Getting started with Blogger - first things first

    Options for linking photos in Picasa into your blog

    Finding a picture's URL in Picasa-web-albums

    Auto-renewing your blog's custom domain

    / Friday, May 13, 2011 /
    You can make sure that your custom domain name is (or isn't) automatically renewed each year, if you purchased it through Blogger or through Google Apps.


    What is renewing a custom domain about?


    If you have purchased a custom domain (eg www.fred-fish.com), then you have the right to use that name for however long you purchased it for.   How long that is depends on the contract with the domain-registrar (ie the company that you purchased it from).

    If you purchase a domain through Blogger (and thus through one of eNom or GoDaddy), the only option you have is to buy it for one year.

    After the term of your contact is finished, you need to either buy it again or switch your blog to use another domain name (perhaps your old blogspot name).   And if you don't buy the domain again, someone else will be able to buy it.

    If your custom domain name is important to you (and it will be if your blog is successful), then you will want to make sure that you have done the "paperwork" to re-purchase well before it's due to expire.   Your domain registrar should send you a reminder email about a month before the registration is due - but it's sometimes very easy to miss details like this.

    Luckily, Google makes it easier by providing an option to automatically renew your domain each year.


    Using the auto-renew option


    When you first purchase a domain, one of the questions is whether to automatically renew the registration each year.   I usually answer "no" because I don't want my credit card charged with something I didn't specifically authorise.

    But there are some domains that have become very important to me, and I want to be certain that they are renewed.  So I'm prepared to turn auto-renew on for them.


    Follow these steps to turn domain auto-renew on:


    1  Go to Google Apps   (www.google.com/apps)


    2  Sign in by entering your domain name, and choosing Manage this Domain.


    Log in with the administrator account that you set up when you first purchased the custom domain.


    4  Choose the Domain Settings tab, and from that the Domain Names sub-tab.


    5  Make sure that the the Automatic Renewal check-box is set to on, ie ticked (or off / unticked if you don't want to auto-renew).


    6 Press Save


    What happens next


    If the Auto-renew option is ticked, then about a month before the renewal is due Google sends you an email to remind that that it's going to occur.  

    After that, at the appropriate time, Google charges the Google Checkout / Wallet account associated with your Google Apps account (ie the one you used to purchase the domain) for a one-year renewal.

    The one thing that you need to do is make sure that the credit card that you have linked to the Google Checkout account is still valid.

    You can find more information about Domain payments on this Google help page.


    Related Articles


    Checking the credit card that is linked to your account

    Setting up an administrator for your custom domain

    Transferring Blog Ownership.

    Understanding Google accounts

    Google's Help Forums

    / Wednesday, May 11, 2011 /
    This article introduces Google's Help Forums: these are the main way of getting support for non-paid products. The forum for Blogger is particularly strong.

    Update:

    Google introduced a new Product Help Forum in mid-March 2012.   Read more about this...

    The old help forums are still available read-only.

    The new help-group can be reached from Blogger.com:  choose help from the gear-wheel menu at the top right of the screen.

    The following material is kept for historical purposes only:   it is no longer current.


    How are Google's Help tools organised? 


    For each "product" (Blogger, AdSense, Custom-Search, Maps, etc etc) Google has as set of Help Articles, and a Help Forum.


    Generally the link to these is at the top right hand corner of the screen.


    The Help forum's are particularly useful if you've searched for the solution to something and cannot find it, or if you want some tips about how to approach something.


    Help forum features:


    Each product's Help Forum includes:
    • A left hand column, where you can switch between the forum and articles, and where you can Post a Question
    • A middle column which shows the Discussion Categories, or the most recent questions if you've chosen a category.
    • The right hand column highlights some of the most popular discussions.


    When you initially browse through the questions in the Forum, you'll notice that many of them are written with bad spelling and/or grammar, or seem to be asking incredibly basic questions.   But don't be discouraged:  many Google users have English as a second (third, etc) language, and many do a lot of texting (moderate amounts of txt-spk are allowed in these forums, unlike many others).  And some are very, very new to blogging and don't seem to have read the help files yet.


    And there are some very helpful people, who at times give absolutely brilliant answers - for example, this one about how to get your blog noticed by search-engines.


    Hints for using the help-forums


    Help-forums only survive long term if people give good answers as well as ask questions.   Every time you ask a question, browse through and find 2-3 not-yet-answered questions that you know the answer to, and post answer them.   Doing this:
    • creates good karma,
    • gets your post count up, and
    • frees up the more experienced people to answer other, harder, questions (like yours!)


    Always include your blog's URL (www.YOUR-BLOG-NAME.blogspot.com) and your location (ie the city and country you are in) with your question: it makes answering questions much easier.


    Be as specific as you can:   say what you were doing when an error message appeared, and what you're wanting to achieve.


    Related Articles:


    Blogger and other Google products

    Blogger and non-Google products

    Understanding Google accounts

    Setting up AdSense on your blog

    Stop malicious use of your AdSense account ID

    / /
    AdSense's Allowed Sites feature, is an important safeguard for any blogger who is worried that others may try to mis-use their AdSense account and/or get them in to trouble.

    The article is written with Blogspot users in mind, but the advice applies to ANY AdSense publishers.

    Overview:

    By Андрей! (Own work) [Public domain],
    via Wikimedia Commons
    Previously, I've described setting up Adsense in Blogger, and putting AdSense ads right inside your posts.

    The way that AdSense works with web-browsers, any person, or computer, can look at the source-code for you page (eg with the View / Page Source menu-option in Firefox), and see what your AdSense publisher ID is.   If they're clever or malicious enough they could potentially put ads with your publisher-id onto sites that don't meet AdSense's program guidelines (eg ones that encourage readers to click the ads).  And then they could report "you", and get you banned from AdSense for doing this.

    Luckily, AdSense has the Allowed Sites feature to combat this.  Basically, you enter the  URLs (ie names) of sites you own, and only earnings from only those sites will be recorded in your account.  You aren't held responsible for any other sites where your publisher-id is used.


    How to turn Allowed Sites on:

    Log in to AdSense (www.google.com/adsense/)

    Inside AdSense:
    1. In the Home tab, choose Account Settings from the left-hand navigation list.
    2. Scroll down to the Access and Authorisation section (currently at the bottom of the page)
    3. Click the edit link, beside Sites authorised to show ads
    4. Make sure that Only allow certain sites to display ads for my account is ticked
    5. Enter the list of sites that you own in the Authorised Sites list
      (for each one, just enter the "naked domain", ie foo.com, not www.foo.com)
    6. Click Save at the bottom of the section.


    What do do next:

    If you put your AdSense ads on any other blog or websites in the future, you do need to remember to add them to the Allowed Sites list.

    Also, along with allowed-sites list, AdSense shows a list of non-allowed, websites (blogs and others) that have also tried to use your Publisher-id.   Check this occasionally, in case you've forgotten to add a new blog/website to the list, or in case you'e added a feature (eg the Translate this page widget) that effectively creates one.  The list is only updated weekly, so sites will still be on it for up to a week after you've allowed them.  However the Allow feature works immediately.


    Related Articles:


    Setting up Adsense in Blogger

    Putting AdSense ads right inside your posts.

    Blocking categories of AdSense ads from your Blog

    Putting an AsSense-enabled custom search engine in your blog

    Getting the HTML code to put a picture into your blog

    / Tuesday, May 10, 2011 /
    You can use the Post Editor to get the HTML code that you need to put a picture into your sidebar (or header or footer, or anywhere else a gadget can go).


    Overview


    The Picture gadget is the normal tool for adding a picture to your blog's sidebar.

    But there are times when you want more control over the picture size or behaviour.  Eg, you may want to have two pictures very close to each other and guarantee that they're the same size.   To do this, you need to get the HTML code for the picture, and then put it into your blog.  Fortunately, Blogger's Post-editor make it very easy to do this without writing the code yourself.


    Using the Post Editor to generate the HTML for a picture


    1  Start a new Post  (you're not ever going to publish this:  it's just a work-area)

    2  Don't enter any text:   just use the Picture icon on the toolbar to add a picture.   Blogger will prompt you to upload the picture, or to choose it from a Picasa-web-album, or to enter its URL:  add the picture the way that you usually would.

    3  Switch to Edit HTML mode   (called HTML in Blogger-2011)
    This will show you the HTML code for displaying the picture, as it is set to display in the Post (depending on the picture-settings you've chosen, it may be centered or right/left aligned, and the size may vary).

    Copy the HTML.

    5  Switch back to Compose Mode, called Compose in Blogger-2011), so you don't get confused the next time you edit a post.

    Return to the list of posts:  you may be asked if you want to leave the page without saving - the answer is Yes.  Or you may have a new draft-status post, which you can delete.

    You can now paste the HTML code that you copied into into an HTML/Javascript gadget, or anywhere else that you may need it - even into another post that you are editing in a separate window.


    Related Articles: 


    Stopping pictures on your blog from being "clickable"

    What are Picasa-web-albums?

    Finding the URL of a picture that's stored in Picasa-web-albums)

    Inserting a Picture into a blog Post.

    Putting 3rd party HTML into your blog

    Center-align the gadgets on your blog

    Hosting pictures outside of Google / Picasa

    Inserting a picture into your blog as a gadget

    Labels

    Thank you for visiting my site. I’m the author of home decor help, home garden decor, home design interiors, tina 4 home design, uhozz, visit yogurt lab, sitazine, is beauty tips and sunnijati website. Modestop Topmodest Free Beauty Tips Shitazine Sitahouseblog Izhealthy Shitadesign Sitahouse Topmodest Sitazine Irezine Home- decor-design Shitadesign Shitadesign-dot-com Inhomeland inhouseland ghiuldenika inebautystyle enterarteiuna radiodominiopublico biberealexandru fabiobernadosdi geeklore31 syahadah-alhafeezah peaceloveiman bigwideempty techandchefadventures kaosgunlugu fikirkulubleri duazinciri theinternationalrules morefortngintn monkeymanzach lifeatthegreenys photokid84 chelsea-settles chasingmommyhood sexyhotactresseswallpaper tophotnewstodays avvani urbantrendsussex voychic reisyamode sitazine reportmy homedesignideasx mystylepinterest fashionstyleco popularnewstips isexy-hot-girls sexywomengirl trendymodeku derumahdesign womenhairs hackoblogger gadiswomen homeinteriordesignideas1s homedesignideasa uniquehomedesignsw enterpreneurforbloggers earningblogtipss lilyandgiasmom onfeatureblog aboutadsen onblogsocial tecnologiku onlinekutip akuhub caramakemoney youseoneed blogukus newbieblogit adsenseguideto triond-adsense inseoservice intipseoblog otherseoblog freeseoguid seoblognets tawaguideblog seosecretip buzdesign modewomen gayawoman cantikide tipsehat bebeautyps tipsjilbabcantiks idekontenislami healthfitnessnutritionsz jilbab-tips tips-home-decor caramemakaijilbabv beritaremajaterkinie allisoncrewnews mypinspinterest mypinspinterest gogirlsgallery seyhotgirls topmodest worldotgirls seksigirlsblog yourgirlsnet sexywomensia decorativehousedesigns simplebloggertipsz aboutadsense09s marketingner freeseotipstricksz womensiana chicstylegallery oblogkudewe colhomegallery marketserve onlibusiness artodesign designinguide oninteriorhome interiormu intutorblog blogoffeed newbloggerhint enginseo dibisnistips internetmublog onroomdesign homegardenco

    Blog Archive

     
    Copyright © 2010 New Blogger Tips, All rights reserved
    Design by DZignine. Powered by Blogger